
Embroidery Digitizing
The most common type of embroidery is digitizing embroidery used to add pictures to the embroidery. Make sure to have a machine, appropriate software, and a well-experienced team of digitizers. The role of a digitizer is to import the image, then define the shapes and lines (vector-based images) by applying stitches to these lines to digitize a photo. They can digitize a photo manually or by using the auto-digitizing features of the software.
Digitizing Software:
As we are talking about digitize a photo, the role of software cannot be neglected. Digitizing software allows to digitize a photo in a way so that machines can read them easily. Some of this digitizing software is available to use without any cost.
You can check free embroidery digitizing programs such as ink/stitch, Embird, Hatch, etc. To digitize a photo, you will have to invest more than expected to make your work valuable.
Image Files For Embroidery
Embroidery machines are not able to read all types of files as computers do. You have to choose the right file format according to the machine. In order to digitize a photo, you need to be familiar with the types of image files. Among all, JPG and PNG are considered as best image files used for digitizing and then converting into embroidery. But it can vary according to the image type. For example in a colorful picture, every color will need to be stitched out by matching thread color.
JPG/JPEG– Pixel-based image file used for the images that you took by yourself from a phone or camera and then upload on a computer. You can compress this file without losing image quality. But hard to convert into embroidery because these pictures have backgrounds and colors that require additional programs to convert it into embroidery.
(Pixel- Refers to the picture element. When you click on the image, you will see how the different pixels are united to form a picture.)
You can convert a JPG file to a DST file with the use of a background removal tool.
PNG– This file is used for digital artwork and supports color variations with transparent background.
GIFs- Differ from PNG files and support only 256 colors.
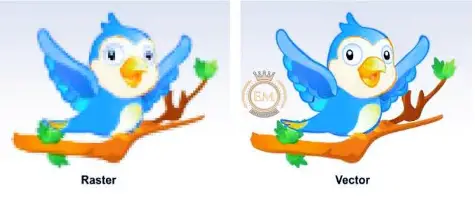
Vector image– Easy form of image conversion into an embroidery file. You can turn a JPG image into a vector image as it is easier to digitize a vector image. You can store vector base images in the computer in the form of points and direction lines.
Different formats of vector images are AI, EPS, and SVG. Before importing a picture to digitize, make sure to lower the resolution by using tools.
Raster image- Carefully choose the raster images. To digitize a photo, try to use a simple image. With Complex photos, a lot of sections of color result in broken stitches. You can use illustrator to simplify your image in order to digitize embroidery design and can reduce the number of threads into auto-digitization.
Step-By-Step Illustration of Digitizing A Photo To Embroidery
Learn how to digitize a photo by using these steps. But before this, get your file ready to digitize.
Step 1: Remove the background of the photo before converting it into an embroidery file
- Remove the background first before uploading your image file. You can do it by using Photoshop.
- Click the image and delete the background. If you are not using Photoshop, you can do this by using a free tool such as remove. bg. (https://www.remove.bg/).
- After that download the image that is simply in PNG file format. As mentioned above, a PNG image is a pixel-based image with a transparent background.
Side note: if you are using an image that is not your own, or copyrighted, you should ask for permission to use this image for advertising and selling your design to avoid any illegal activities.
Step 2: Use embroidery software to convert photos into an embroidery design
- We all know that every type of embroidery software has the capability to convert images into embroidery designs.
- Best among all is SewArt and Inkstitch which are available at low cost to convert the file types in order to digitize a photo. (Inkstitch is available free to use).
- If you are using SewArt, you can convert JPG into a PES file. But with Inkstitch, you will need to convert a pixel-based PNG file into a vector-based SVG file to digitize a photo.
- You can also use a vectorizer for this purpose. Simply upload your PNG file and it will turn out into a vector image. Then download this picture as an SVG file and upload it to Inkstitch software.
Side note: There is one downside of converting a pixel-based photo into a vector-based image because you may lose the quality of the image. With colorful images, you might face difficulty to convert and digitize a photo.
Step 3: Upload your image
- After you convert the image into a suitable file type, it is suggested to you to make two copies of your image files to digitize in case of any mishap occurring with the original image.
- Upload your image file PNG or SVG into the program.
- Crop the excess area around the image you don’t want to be embroidered.
Step 04- Set the desired size of the design
- Set the length and width of the design according to the area you want to be embroidered.
- Measure the area of fabric onto which you want to digitize a photo and use these measurements to scale that image accordingly.
- Once you have done this, lock your design size so it remains the same throughout the process.
Step 05: Reduce colors
- Sometimes you need to reduce the number of colors according to the program you are using.
- For example, SewArt imports the image file of only 6 colors when you convert a pixel base image to a vector base. It is always recommended to reduce colors to get rid of speckles.
- The resulting image would be of flat areas of colors.
- Once you reduce the number of colors, set the thread colors according to the image.
Step 06: Choose the stitch types
- In this step, you have to choose the right stitches according to your design to digitize a photo.
- There are certain types of stitches used for different purposes.
- Satin stitch is used to design text and borders.
- Straight stitches are used for outlining, shading, and showing the details.
- Fill stitch is used for large designs to fill the space.
- You can monitor and change the stitches by using tools provided by the program.
Step 07: Consider stitch directions
- It is basically the path your machine follows to create the design.
- You should be careful while setting the stitch direction during digitize a photo. Any mistake in this process can lead your design to move in the wrong way.
- You can also prefer a program that offers auto-digitization features. But these programs can be expensive.
Step 07- Save, Transfer, And Test The File
When you have digitized your photo, now save it as an embroidery file. Transfer it to the machine using a USB, flash card, or directly from the computer. Get your machine ready by checking elements such as selecting the needles, threads, orientation, and the path of embroidery on the selected area. Then the last step is to perform a sample test before actually digitizing the photo for embroidery to attain better results.
Sometimes you need to convert a design file into a different embroidery file. Some important conversions are as follows:
JPG/JPEG to DST file
First of all, remove the background of the image by using the tools mentioned above. Then download the image as a PNG file. But with Inkstitch, change the image and save the file as SVG. Upload this SVG or PNG file into digitizing software and apply these digitizing steps. Then save the file in the drop-down menu and download your file to the computer.
PNG to PES
This is the same process as above. One benefit of a PNG file is that you don’t need to remove the background. You can simply upload the PNG file to the software, digitize the file then save it in PES file format.
JPG to PES
Firstly, remove the background and save it as a PNG file. Upload it to the digitizing program and select file type PES and save it. You can easily download it as PES into your computer.
For more information about convert jpg to pes click here.
Example of digitizing photo
Consider you are using Bernina embroidery software for digitizing photos to embroidery. Let’s have a look at the process of digitizing a photo.
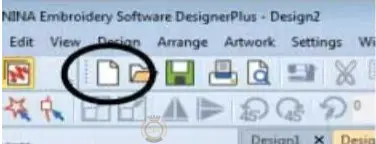
Step 1- Open the software and create a blank design.
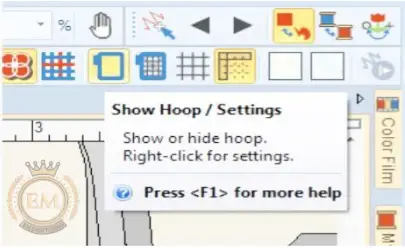
Step 2- Click on the “Hoop setting” option. Set the machine and set the hoop size according to the design mentioned above.
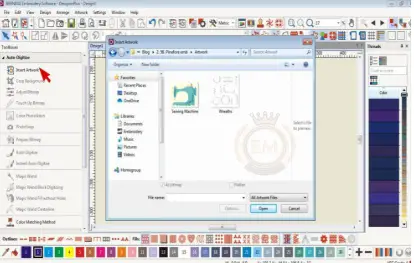
Step 3– From the auto-digitize toolbar, select insert artwork and your file. As I told you use EPS file type for vector base image.
Step 4- Set the design size as you want it to be embroidered under a hoop. Make sure your design must be fitted into the hoop.
Step 5- Click on the auto-digitize icon. And then set the no of colors to use in the Bitmap.
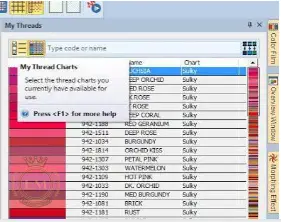
Step 6- Select add Thread chart to the palette by using the matching method. Add “>” art + design to My Chart and remove “<” other thread charts from My charts column and click Ok.
Step 7- Set an option for each color thread. For example,
Fill/ Detail /omit-ignore white background of image etc.
And then click Ok.
And that’s all. Now what you need to do is just press the Bitmaps button in the top toolbar to hide the artwork and this will show only the digitized embroidery. And in this way, you can successfully digitize your photos by using an embroidery machine.
Conclusion
I am damn sure you will enjoy this post and make a lot of fun utilizing your artwork in this way. Just remember to follow these steps carefully to digitize photos of your gallery. You must be familiar with which file type will be read easily by your machine for digitizing. So make sure to choose the right image file and convert it into a well-suited embroidery file. This conversion is just a click away. With the use of inexpensive digitizing software, you can digitize your photo into the embroidery design of your desired medium by the use of an embroidery machine. (fabric/jacket/bag, etc.)


