
Machine embroidery is like painting with thread. You take a design, load it into your embroidery machine, and watch as the machine meticulously stitches the design onto fabric.
It’s a creative and fun way to add personalization and unique embellishments to various projects, from clothing to home decor items. But did you know that you can also embroider on paper?
Yes, you heard it right!
Machine embroidery on paper is a fantastic technique that allows you to create stunning and intricate designs on paper, perfect for greeting embroidery cards, invitations, and other paper crafts. This step-by-step guide, we’ll walk you through the process of paper embroidery.
So, let’s grab our scissors, thread, and paper and get ready to embark on this creative journey!
Machine Embroidery On Paper: A Step-By-Step Guide
Gathering the Necessary Paper Embroidery Materials and Tools
Before embarking on any embroidery project, it’s essential to gather all the necessary materials and tools to ensure a smooth and successful crafting experience.
Choosing the Right Paper Types
Before diving into machine embroidery on paper, it’s essential to select the right paper for your project. Look for sturdy, medium-weight papers that can withstand the stitching without tearing or warping.
Cardstock, watercolor paper, or scrapbooking paper are great options to consider. Avoid thin or delicate papers as they can be challenging to work with and may not hold up well under the pressure of the machine.
Selecting the Suitable Embroidery Threads
When it comes to choosing embroidery threads for embroidering paper, opt for lightweight threads that won’t weigh down your paper or cause it to buckle.
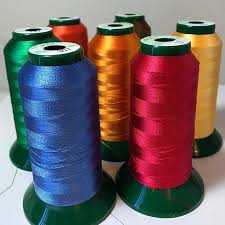
Rayon, polyester, or metallic threads work well for paper embroidery. Consider the color palette and the design of your project to choose threads that complement your vision.
Essential Tools for Machine Embroidery on Paper
To ensure a smooth and successful embroidery experience, gather the following essential tools:
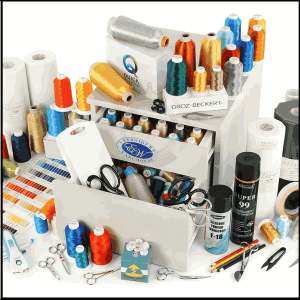
A sewing machine with an embroidery function: Make sure your machine is equipped to handle embroidery stitches.
Embroidery needles: These needles have a slightly larger eye to accommodate the threads used in machine embroidery.
Scissors: Invest in a pair of sharp scissors for cutting both paper and threads.
Embroidery stabilizer: This will provide support and prevent the paper from tearing or distorting during stitching.
Tape or adhesive: To secure the paper and stabilizer in place before embroidery.
Preparing the Paper for Embroidery
Embroidering on paper requires careful preparation to ensure the material can withstand the stitching process without tearing.
Tracing and Cutting the Paper to Size
Start by measuring and cutting your paper to the desired size for your project. Use a ruler and a pencil to mark the dimensions, then carefully cut along the lines.
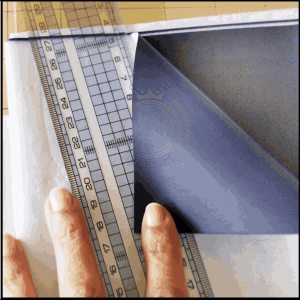
Ensure that the paper fits comfortably within the embroidery hoop, leaving some space around the edges for maneuvering the machine.
Strengthening the Paper for Embroidery
Paper can be a bit delicate, so it’s essential to reinforce it for embroidery. Place a piece of embroidery stabilizer, slightly larger than your paper, underneath the paper.
This will add stability and prevent the stitches from distorting the paper. Secure the stabilizer and paper together using tape or adhesive around the edges.
Now, you are ready to move on to the fun part – designing and transferring your embroidery pattern!
Preparing the Design: Digitizing and Choosing Patterns
Preparing the design is a pivotal step in the embroidery process, involving digitizing your artwork and selecting suitable patterns that match your project’s needs.
Digitizing Your Design
Before you start embroidering paper, you’ll need to digitize your design. This involves converting your desired image or pattern into a digital format that your embroidery machine can understand.
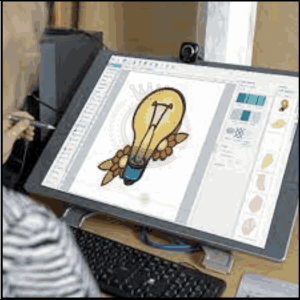
If you’re new to digitizing, there are many software programs available that can help you with the process.
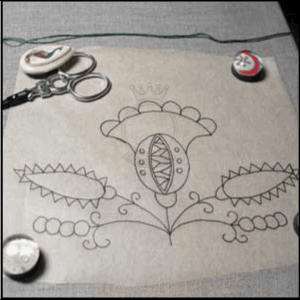
Choosing Suitable Patterns for Embroidery on Paper
When selecting patterns for machine embroidery on paper, keep in mind that intricate designs with fine details tend to work best.
Avoid designs with large areas of solid stitching, as they can put too much stress on the paper and cause it to tear.
Opt for patterns that have lighter stitching or elements that can be easily cut out.
Customizing and Editing Designs
Don’t be afraid to get creative with your designs!
You can customize and edit existing patterns or even create your own. Experiment with resizing, rotating, or combining designs to make them uniquely yours.
Remember, the goal is to have fun and let your imagination run wild.
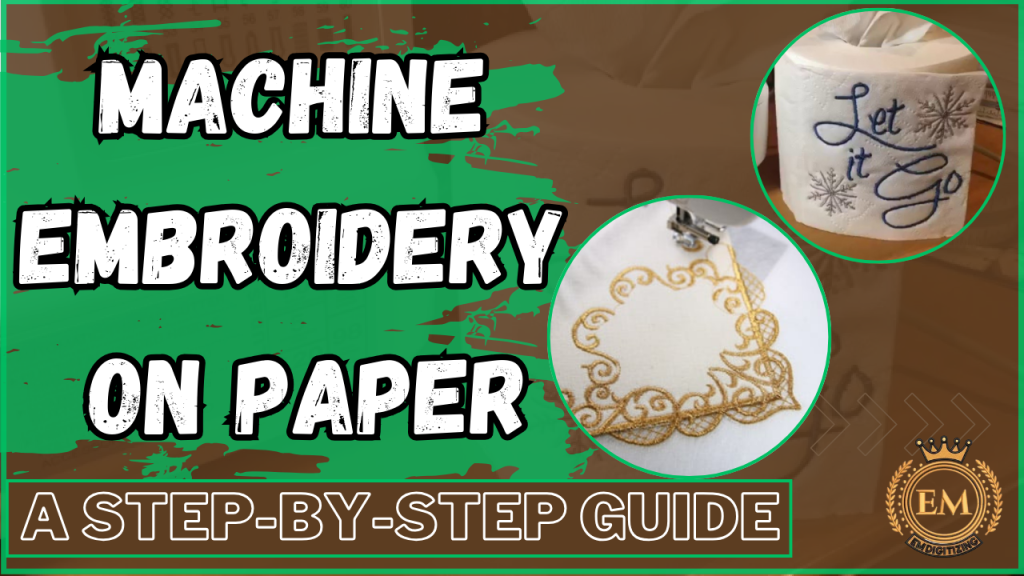
Step-by-Step Process: Embroidering on Paper
Embroidering on paper is a unique and creative technique that blends the art of embroidery with papercraft.
Hooping and Stabilizing the Paper
Just like with fabric, hooping is an essential step in machine embroidery on paper. Grab your embroidery hoop and insert the paper, making sure it’s taut and secure.
To provide extra stability, consider using a lightweight tear-away stabilizer or a sheet of adhesive stabilizer. This will help prevent the paper from shifting or puckering during embroidery.
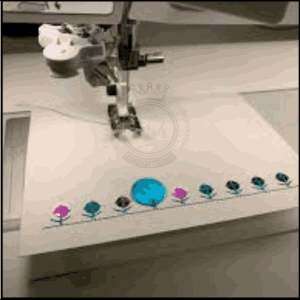
Embroidering the Design: Stitching Techniques
Now comes the fun part – stitching your design!
Select an embroidery design paper that suits your project and load it onto your embroidery machine.
Adjust the settings to accommodate the paper’s thickness, such as reducing the speed or using a smaller needle.

As the machine works its magic, keep an eye on the stitching process to ensure everything is going smoothly.
Once the design is complete, gently remove the paper from the hoop, being careful not to damage any stitches. Voila!
You’ve successfully embroidered on paper.
Tips, Tricks, and Troubleshooting for Machine Embroidery on Paper
- Experiment with different types of paper, such as cardstock or handmade paper, to achieve different textures and effects.
- Test stitching on a scrap piece of paper before starting on your final project to ensure everything is set up correctly.
- Use a smaller hoop for more intricate designs to support the paper better and prevent excessive movement.
- If you encounter thread breakage, try reducing the tension or using a thicker thread weight for added strength.
- Have fun and embrace imperfections! Machine embroidery on paper allows for a whimsical and unique artistic expression, so don’t be afraid to take risks and enjoy the process.
Conclusion
Machine embroidery on paper opens up a world of creative possibilities, allowing you to merge the artistry of embroidery with the elegance of paper crafts.
By following the step-by-step guide outlined in this article, you can confidently embark on your own machine embroidery on paper projects.
Remember to experiment, try new techniques, and let your imagination soar as you create unique and stunning designs.
So, gather your materials, set up your embroidery machine, and let the magic of machine embroidery on paper unfold.
EMdigitizing: Embroidery Digitizing Expert At Your Service
If you are interested in any kind of embroidery project, then EMdigitizing is the best option for you. We offer embroidery digitizing and vector art services with a fast turnaround time. You can also visit and check our website as well as our best services.
We also offer a great 50% discount on all our services for our respected first-time clients. We also offer free quotes generated in just 5 minutes.
You should grab this limited-time offer and take your embroidery project to the next level with EMdigitizing.
If you’ve any queries regarding this topic, you can ask them. Thank you for taking the time to read this article.
Frequently Asked Questions:
Yes, you can machine embroider on paper, using a stabilizer to prevent tearing and choosing designs with lower stitch densities to avoid perforating the paper excessively.
To embroider step by step: start by selecting your design, transferring it onto your fabric, securing the fabric in an embroidery hoop, threading your needle, and then following the pattern with your chosen stitches.
Improving your embroidery machine can involve regular maintenance, updating its software (if applicable), using high-quality threads and needles, and practicing with various fabrics and settings to enhance your skills.
Normal paper can be used for embroidery, especially for projects like greeting cards or bookmarks, but it’s best to choose thicker paper or cardstock to prevent tearing.


