How to Convert image to DST file for embroidery Step by step guides

How to Convert image to DST file for embroidery Step by step guides

Embroidery Digitizing Services

If you are looking for embroidery digitizing services, EM digitizing is one of the best embroidery digitizing company. Providing all types of embroidery digitizing. I recommend you test digitizing services.

Converting an image to DST embroidery file is not a simple process. We will go to all possible ways to create a DST file for embroideries like png to DST, jpg/jpeg to DST file, and pdf to DST file for the embroidery machine. Before going into detail, I would like to review files formats. 

What is a DST file for embroidery?

A DST file is a format of embroidery machine which stores the embroidery commands of machine functions. All those commands are a set of instructions that are used by the embroidery machine. A DST file can be generated by embroidery digitizing software, and Tajima Company initially launched the DST file format.

What is a PNG file?

The PNG(Portable Network Graphics) file format is a raster-graphics file, widely used on websites to display high-quality digital images. Created to exceed the performance of GIF files, PNGs offer not just lossless compression but also a much broader and brighter color palette. 

What is a JPG/JPEG file?

JPG and JPEG are technically separate image files format. Working with both file formats is the same, so I am discussing them together; when it comes to .jpeg vs .jpg, the truth is there is no difference between the two except the number of characters. 

JPEG stands for the Joint Photographic Experts Group, which is the name of the sub-committee that helped create the JPEG standard and other still picture coding standards under the broader group called ISO.

What is a PDF file?

Portable Document Format, standardized as ISO 32000, is a file format developed by Adobe in 1992 to present documents, including text formatting and images, in a manner independent of application software, hardware, and operating systems. Definition resource, Wikipedia

How to convert pdf to DST file?

Converting a pdf file to DST file is not a simple process, a pdf file is not readable in major embroidery software. If you have a pdf file, then you should convert pdf to an image file. Then you can create DST design easily from an image png or jpg/jpeg format.

There are two ways to convert any pdf file to an image for digitizing.

Convert pdf to image online free

Many online tools are available that convert pdf files to images for free. An online tool PdfToImage is one of them. The process of converting a pdf to an image is pretty simple: just upload your pdf file, and after a few processes, you will be able to download image files for free.

Convert pdf to image by offline software

The following software can be used to convert PDF to JPG/JPEG files with an Offline Version for Free Download

  1. TalkHelper PDF Converter. Windows 7/8/8.1/10
  2. Boxoft PDF To JPG Converter
  3. Zamzar PDF To JPG Converter
  4. PDFMate PDF To JPG Converter
  5. Docufreezer PDF to JPG Converter
  6. Go2Convert Image Converter
  7. PDF2JPG.NET.
  8. Reezaa PDF To JPG Converter.

My suggestion is that you should use online tools to convert a pdf to image files. Because it is simple to use and there is no need to install software on your computer.

Convert image to DST file for embroidery

The DST file can be generated by an embroidery digitizer. You are mistaken if you believe that a jpg file can be converted to DST with a single click. Unfortunately, there isn’t a one-touch solution.

Requirements:

  • Embroidery software
  • Little skill in computer operations
  • Little effort of yourself
  • Image file to convert into an embroidery design
  • The proper size of embroidery design

Image manipulation to manipulate embroidery design

Upload the image file into the program

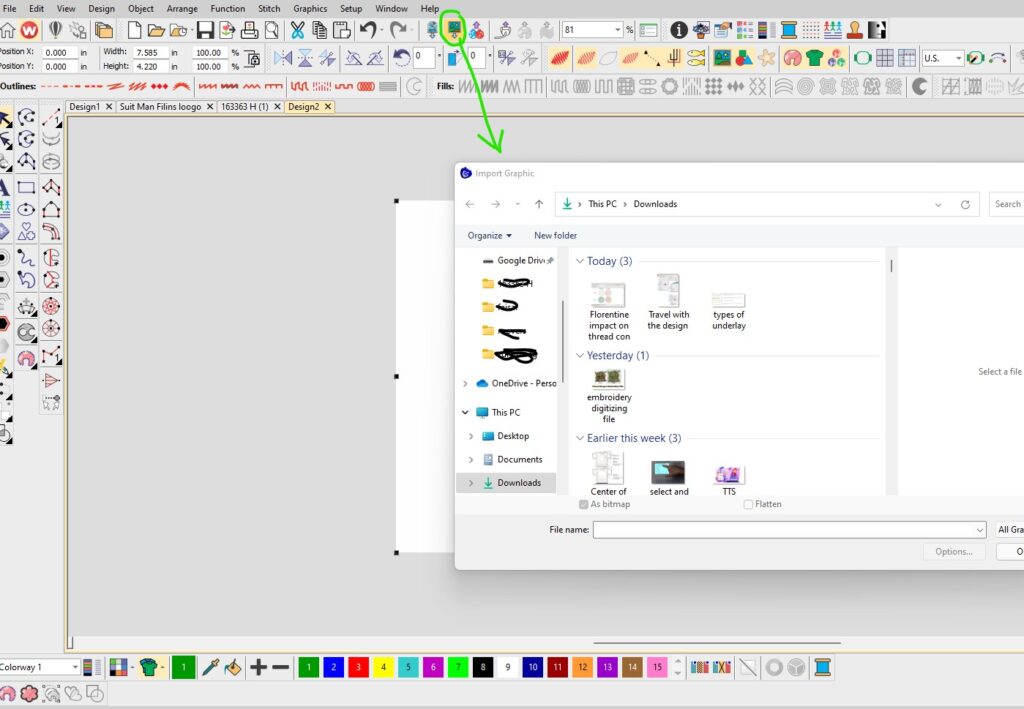
The first step is to upload an image to the program. This way you’ll be able to convert the image to embroidery format to perform other purposes.

  • Click on the menu at the top bar and hover your mouse over the image, select the inset image file.
  • Be sure to select the appropriate options for files when searching for your file.
  • Choose the image file you downloaded from the required section to begin digitizing to create embroidery.
  • I’m assuming that you’ve successfully uploaded an image file such as this.

Upload the image file into the program

This is the jpeg image that we convert into an embroidery file. There are no limits that you are able to convert any image file to the DST format or any other format for machine embroidery.

Make sure to crop the image file prior to proceeding further.

It is best to establish the desired size at the beginning of the process, rather than later. This means that we must first cut the image before moving ahead.

 crop the image file prior to proceeding further

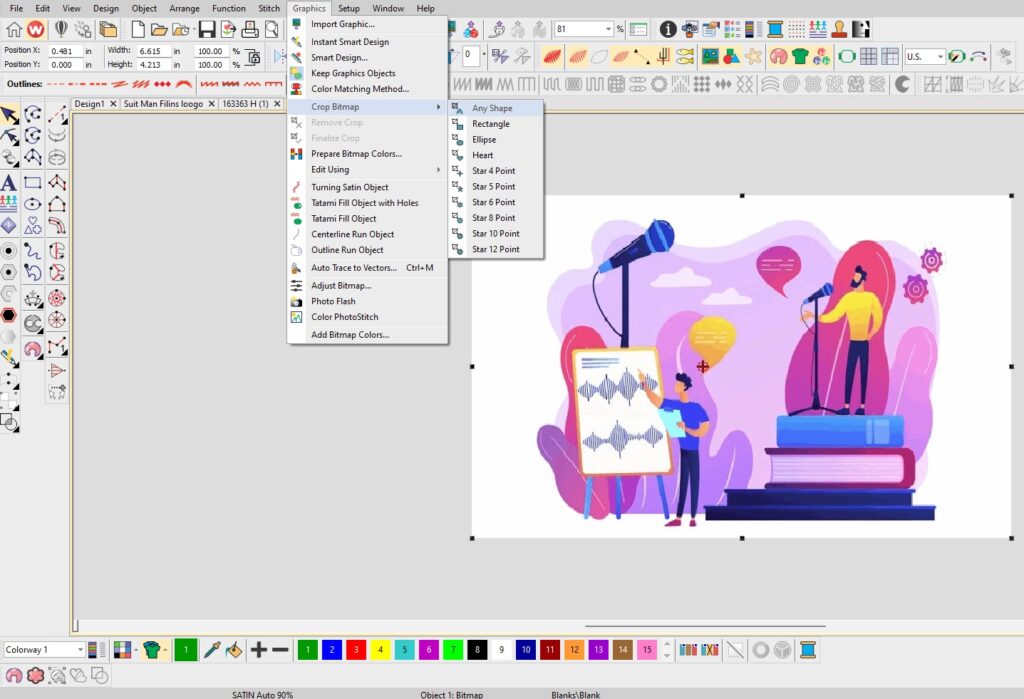
  • Click on the image section in the menu bar at the top, hover your mouse, and then select the cropped bitmap using the polygon tool.

Hint: Make sure you have chosen the correct file prior to making this. You can also use windows paint to do this since it’s not required to do so in this software just.

  • Pick a particular part of the image by drawing it using the polygon tool.

Hint: left mouse click is used to select corner node, as well as right-click to select around the corner. In order to choose the picture area, it is necessary to utilize both clicks to achieve greater selection. When you’ve selected the image’s desired area, press the enter key to start the cropping, and the photo will automatically be cropped.

  • The file was successfully cut according to our choice

Then, set the size you want for the image

It’s now time to determine your file’s size. This will be the size of the embroidery. The file size can be changed in the beginning does not mean that we cannot alter the size following the finalization of the task. We can certainly do this. However, it is a good idea to make this change at the very beginning of the work process. So, let’s begin!

  • Change the metrics we use. In this way, you’ll be able to enter your design’s dimensions in inches instead of millimeters.
  • Unlock the lock icon when you wish to alter the file’s size in both height and width. If not, then keep it locked. Fill in your dimensions in both width and height fields. Make sure to enter it in inches instead of millimetres.

Secure the image before converting an image into an embroidery

Why is it necessary to lock the image? Because we don’t wish to alter this image. Therefore, it is best to secure this. By locking the image file, you’re protecting it from unanticipated changes. Once you have locked it, you can work with the jpeg file without fear because the file is simply locked and cannot be moved until it is released.

  • To lock the photo and hit “k“, The image will then be locked.
  • To unlock the lock, press” shift+k.”

Starting logo digitizing for embroidery

Change measurement option

You can also change the measurement option. By doing this, changing the measurement option from us to metrics provides you with more control over the size of your design. Since “us” shows measurements in inches, it can be challenging to determine the size of small objects.

Find object’s in the beginning

Prior to beginning digitize embroidery work, it’s necessary to measure the object at the very beginning of the work. This way you can determine the dimensions of the object, and determine which stitch is best suited to the particular object. As I said earlier, the different stitches differ in the length of the stitch. Thus, by pressing the “m” key on the keyboard, you can determine the size of the object. 

It is just a matter of setting the starting point you’d like to measure from and then dragging through the mouse until you reach the final point. In this way, a tiny pop-up will display the actual dimensions of the object in the same way as it appears on the screen. This size indicates that we can use a satin stitch which allows this length.

  1. The first step is to begin the digitization of embroidery to create a ring from the image.

In default, the satin stitch is chosen. Therefore, there is no reason to alter it. Pick the ring tool from the bar menu, like the picture. Remember! The bar will appear on the left side of the display.

After you have selected the tool, it is enough to move your mouse over the sequin or the ring. Hold the left mouse button at the center of the sequin or ring, and then move it towards the circle’s circumference. This will draw the diameter of the circle. You must click on the circumference point, and this will draw the width of the circle. In 3rd step and in 4th step, you draw the inner circle’s size and height. 

Drag your mouse to the inner circle’s circumference point, then click to draw an inner circle’s in height. In the final step, perform the same procedure similar to the one you performed in the 2nd step for the outer circle. Simply drag your mouse across the inner circle’s circumference point, it will draw the inner circle’s width. Give yourself a pat on the back since you’ve successfully drawn an embroidery ring.

Change the color of the embroidery object

The color bar allows you to select specific colors. It is located at the bottom right of the screen for design view.

  • The first step is to choose the object you would like for the coloring to be applied.
  • At the very bottom, choose the color you want to use.
  • The application will be made to the object automatically.

This process can be done for one object or for the entire design in one go. The process will repeat as many times as it is necessary to alter the color. Thus, you need to be able to do this with ease.

Know the copy and paste functions

Short key

Left mouse click” for copying objects

“T” for design true view

S” to conceal the design stitches or switch to the wireframing view

If you’d like to hide or see the designs, you can do it using these short keys. We’ve completed one thing and another is identical and we’ll use the copy and paste function. The first step is to select the item that you’ve completed recently. Hold the mouse and then right-click and drag it over other materials like each other. However, before you drag, alter the dragging object in accordance with the image. The same process is used for the reaming of picture items.

Our next target is thread con

Select the circle tool in the left-hand sidebar menu that you selected as the circle tool. Press and hold the left mouse click, additional tools will be shown and you can then place your cursor to your thread’s con.

Your mouse’s cursor should be located at the center area of the yellow thread cone object. If you believe that I am in the correct place, you can press the left mouse button and drag it around the circumference of the circle.

When you do this, drawing a circle, it will appear and then automatically converted into an embroidery design. However, there is a problem that you may have noticed or not. The primary thing is that diameter that the circles are larger than the length of our satin stitch.

We can’t convert the image into a satin stitch. If we want it to have a clear and precise shape, then we must change it to tatami or fill stitch. It is possible to convert them to the type of stitch for any object simply by selecting the object that you wish to use and then applying your stitching type.

Repeat the copying and pasting procedure

If you notice two or more similar objects in the photo. It is more efficient to digitalize just one object at a time rather than one at a time. In our case, the thread con, we have two identical objects. We’ve successfully converted an image into an embroidery free-form. Now, we have the image to be copied and pasted into the object that we converted into an embroidery format. It’s the same procedure as the previous steps. Right-click on the finished area of the image, hit CTRL, and drag it over to the same portion of the picture.

Repeat the step to change the color

The color-changing is the same as what we’ve already done in previous steps.

Drawing a sketch of the thread con

Choose the appropriate tool for the object you want to use. To handle thread con, we’re going to utilize the input “A” tool. The tool is available in the left sidebar tool panel. Simply hover your mouse and click on the tool.

  • After selecting the tool, you can the tool, you can then punch it to match your image, as we’ve completed in the previous section. The process is the same as image cropping.
  • After you’ve completed your con the next step is changing the color. You are probably aware of how to alter the color.
  • Modify the type of stitch if your preferred stitching type is satin. Because of the size of the object, it is not possible to use the satin stitch. This means we must switch to the tatami type. To do this, choose your object first, then apply fill stitch using the upper stitch bar menu.
  • The top and bottom of the thread con will appear behind a recently digitalized object. This is not the true format of the image. Cut and paste the file objects that are in the background of that thread’s con. Following the completion of this step, your image should look something like this.

Let’s begin working on pins

Pins are blue and the process is the same as what we’ve used on other objects. We first need to punch needles inside pins. We will do this by using input tools. This tool is useful because is something you’ve already heard of. The next step would be drawing the same circle as the thread con top bottom.

Remember

  • Make sure to draw only one pin correctly and then use the copy and paste function, similar to what we’ve done for other things. The final image should look like this.
  • The most important part of this step is that once you’ve drawn the on the top of the pin, it will be divided into 7mm lengths in satin stitch. The diameter of the circular area is greater than 7mm. therefore, we must alter the length of our stitch. We also know that we can utilize 12.7mm length for satin stitch. Click on the icon for satin stitch, and the property of the object will be displayed on the right. If you select the second option in the property of the object, remove an auto-split checkbox, and your issue is fixed.

Converting needle shape to machine embroidery form

Our final task has been successfully completed. How did I accomplish this? It’s really simple to use a computer to draw a needle line, and then create a hole for the needle. It’s possible you’ve noticed it or not, but the truth is that it’s actually not a hole, it’s a tiny white shape that sits on top of the line of the needle.

It is possible to ask me what is the reason I’ve drawn this small shape on top of the needle rather than making it a hole in the needle. The answer is very simple. State forward. If you believe that the shape of the upper part is big enough, cut it off the main object. Or, you can create a smaller shape over your main item.

Then give the embroidery shape to the thread lines in the picture with the triple run

Take the triple run tool at the bottom of the input instrument. Click the left mouse button and hold for a short time. After a while, other tools will appear and you can select the tool that you require from the provided options and begin working with it.

The method used to use this tool is simple and straightforward. Start from the beginning point and perform the same way as drawing a straight line using nodes. 

The most important thing to remember is that you keep drawing over the top first, then the bottom later. You might be thinking about what to do to get the thread out of the needle hole, but it’s much simpler than you think.

As I stated earlier, the first of all, draw the lower object first, and higher later. And then connect them. This will make the thread appear the way it was when he was through the hole in the needle. Also, you can alter the color to match what you would on other objects. The entire process is known as converting jpeg into DST embroidery files or png into DST embroidery files.

Setting up additional settings to complete work

In order to finalize the project, we need to perform some additional settings prior to sending our project to the machine. What should we do?

They are also the settings that we’ll apply to our design. For example, Florentine effect to thread con the stitch, density of the stitch, trim, and so on. Let’s go through the steps

Applying Florentine impact on thread con

You may be wondering what it is and the reason behind this effect. Simple enough, we need to refine our work for the final appearance. Therefore, the final look of our work should appear as real-life images. This is why we should apply these effects. After applying the Florentine effect, our thread con threads will get made into a round thread on thread con.Florentine impact on thread con

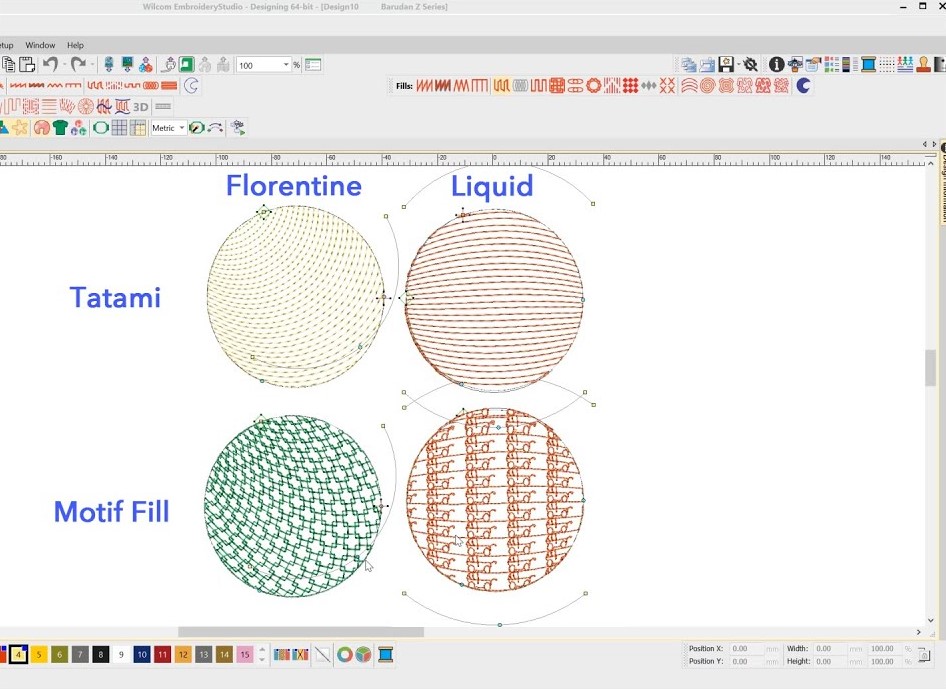
Choose the Florentine effect in the stitch panel of the previous. Highlighted is a Florentine tool.

Be aware that prior to selecting this tool, an object needs to be selected. After using this tool, press the H key to modify the effect. This will give direction to the thread. The result will appear as a con thread that is rounded as I mentioned earlier. After the shape has been completed by you, press the enter key or ESC to display the actual shape of the con thread.

Take a look at the con thread, then you’ll realize that the angle of the stitches has been modified and is now in a round shape.

Hints: Moving the curves from the center or left or right actually alters the stitch angles. The direction of the stitches can be however you want. It’s entirely your choice, but I like the natural appearance as if things take on real life.

Applying underlay at the lower part of the objects

Underlay is a way to keep the fabric from puckering. Underlay is used to draw at the bottom of the outline. It is done using just a few stitches but in an outline format. It encompasses the entire outline of the design. The design is still under the outline.

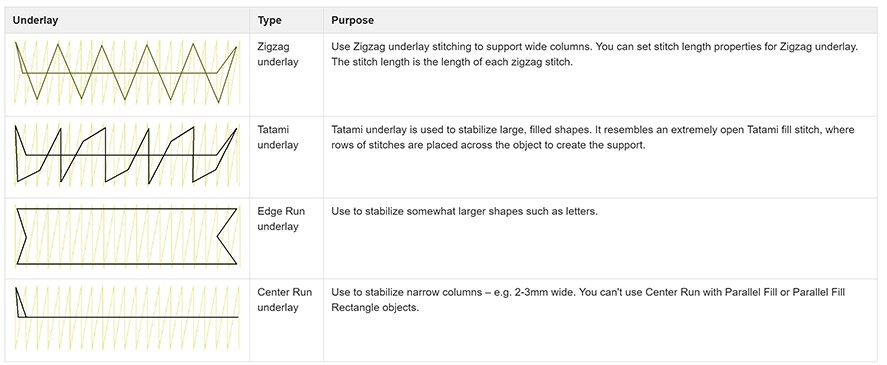
The different types of underlay

  • Zigzag
  • Double zigzag
  • Tatami
  • Edge run
  • Center run

types of underlay

Important point remember 

  • If a tatami stitch is employed to cover a particular object, it must be covered by an underlay that is utilized in the tatami stitch. It is not possible to use a zigzag or any other type of underlay for the object’s bottom that is covered by the tatami stitch.
  • Underlay on the bottom of very tiny objects, or triple. Since there is no reason to use this method for small work.
  • Most often, we employ edge run underlay for all kinds of objects.
  • If edge run isn’t an option, it’s preferable to go with the center run.
  • For larger objects, we suggest using double zigzags with edge runs.
  • If underlay is to be used as the tatami, then an edge run is essential.

Choose the first object where you’d like to apply the underlay. You can choose multiple identical objects that are similar in stitch type or shape. It is better to press the button to change to an untrue view. In this view, you are able to clearly observe the underlay. On the image, you can discern where the underlay will take place. 

After you have made your selection, click the property of the object on the right-hand side of the screen. Choose the first underlay as a zigzag, and the second one as an edge run. You can choose options like length, spacing, and margin based on your requirements of you. If you don’t have to alter anything, don’t be concerned about changing anything. Since by default, everything is in the right shape. Once you have settled your settings, and then applied them by pressing enter or pressing save from the lower part in the panel of properties.

Hints

Center run underlay is used to make thread and needle pins. Pins round areas have been covered by the latest setting that we have put in place. Thus, there is no need to worry about pins around the area.

The settings I’ve applied can only be used for items with a satin stitch design. Also, the settings for a tatami stitch cannot be the same as a satin stitch.

The last thread con that is digitalized using the tatami stitch is covered by a tatami-type underlay. Select your entire thread con, and then go to the property selection. When you select the property option, you need to choose the first underlay as tatami and the second underlay as an edge run. You must also alter the Edge run’s edge margin. You can simply increase the margin of edge run. The edge won’t be separated from the design space. We’re making adjustments because this object is larger than the others.

Travel with the design

Travel with the design
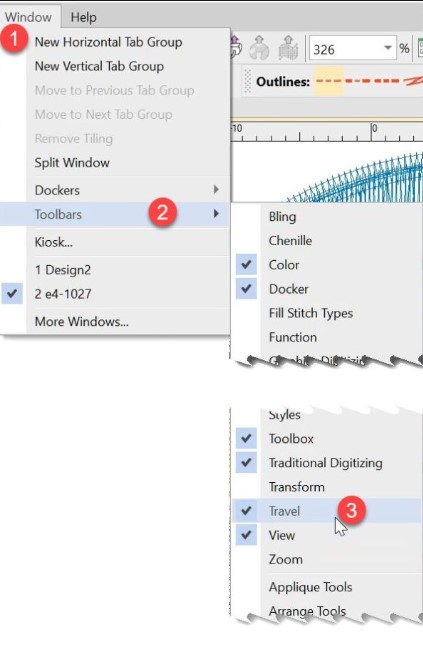
Perhaps it’s a new thing for you, or maybe you’ve heard it before. The primary purpose behind this function of traveling is to design an easy pattern to be used in machine embroidery. This means that the machine follows the pattern exactly as we’ve created it. If we don’t follow this, then it will result in many jumps, trims, and a sloppy machine pattern that is being followed by the embroidery machine. It will also disrupt the processes of embroidery. This is why it’s the most crucial and finalization process to make the machine patterns easier and easier to read.

Let us know what we can do to apply it to our designs. Begin by holding the menu bar, then drag it to the left of your screen. It is a travel toolbar, So at the point of picking it up, ensure that you drag the right toolbar.

Important points to remember:

  • The left mouse click is used for traveling backward, and the right mouse click is used to travel forward.
  • Always ensure that you travel your design through functionalities. Since this will free your time embroidering and reduce redundant time-consuming. Additionally, it will reduce your machine’s time for embroidery. Keep in mind that the same design colors should be digitally digitized simultaneously.
  • Each time you take a cut-and-paste of the object that you’d like to begin your journey from.

How to Convert Png To Dst?

  1. Download and install the latest version of Firestar.
  2. Right-click on one or more Png file(s) on your desktop and select Convert with Firestar.
  3. Type convert to DST in the search box.
  4. Press Convert.
  5. convert png to dst
  6. png to dst converter
  7. png to dst file converter
  8. convert png to dst file
  9. png to dst file
  10. convert png to dst mac
  11. png to dst online
  12. png to dst file converter online
  13. png to dst converter free
  14. png to dst format
  15. png to dst conversion
  16. convert png to dst online
  17. convert png file to dst
  18. png to dst converter online free
  19. png to dst converter online
  20. convert png to dst file free
  21. png to dst free
  22. convert dst to png
  23. convert png to dst online free
  24. convert png to dst file online free
  25. convert png to dst free
  26. jpeg to dst
  27. convert jpg to dst
  28. jpg to dst converter
  29. convert dst to jpg
  30. convert jpeg to dst
  31. dst to jpg converter
  32. jpeg to dst file
  33. dst to jpg
  34. convert jpg to dst free
  35. convert jpeg to dst file
  36. convert jpg to dst for embroidery
  37. jpeg to dst converter
  38. pdf to dst
  39. dst to pdf
  40. pdf to dst converter
  41. convert pdf to dst
  42. convert dst file to pdf
  43. pdf to dst file
  44. convert dst to pdf
  45. convert pdf to dst online free
  46. convert pdf to dst online
  47. pdf to dst file converter
  48. pdf to dst format converter
  49. convert pdf to dst format
  50. convert pdf to dst free
  51. convert pdf to dst file online free
  52. pdf to dst file converter online
  53. pdf to dst conversion
  54. pdf to dst converter online
  55. convert pdf to dst file
  56. pdf to dst converter free
  57. dst file to pdf
  58. psd to dst
  59. convert psd to dst
  60. svg to dst
  61. convert svg to dst
  62. svg to dst converter online
  63. svg to dst converter

Leave a Comment