

When you’ve spent 10 years working with an embroidery machine, you’re bound to make a few embroidery mistakes. This is certainly true for me. The funny thing is, the more stories I share with other machine embroidery geeks, the more I hear the same stories over and over again. Yes, I know, embroidery mistakes are an unavoidable part of the learning process. But if you’re just starting out – wouldn’t it be helpful to know what some of them are so you can cut some down?
So there you are – my top 10 embroidery mistakes and how to avoid them. I hope this helps you learn, or at least confirms that you are not alone. We’ve all done one of those dumb things.
1. Walking away from your Embroidery Machine
Do not walk away from the machine while it is sewing a design. A hard lesson I’ve learned is that the moment I step away from my embroidery machine is the moment all hell breaks loose. In my first embroidery class, I actually asked my embroidery instructor if it was okay for me to walk away from it while machine stitching and she said… “Sure, if you want.”
However, this was terrible advice after walking away from my machine several times while it was running and something catastrophic happened. I would like to revise that answer to a firm “no”. Walking away from your embroidery machine is not a good idea.
Stop the embroidery machine when you are close and can either hear or see something is wrong. I saved many projects when the machine was hanging because I ran and shut down the machine, cleared the problem, and restarted it. Multitask if you must (iron, thread, organize your imagination drawer…) Do what you must to avoid falling asleep at the machine, but don’t get carried away.
2. Selecting Unsuitable Transfer Method
 There are many ways to transfer your embroidery design from paper to fabric. You can use easily washable or water-soluble pens on your material. If they are not accessible, use a pencil. Avoid permanent markers and pencils. In some cases, it won’t matter how long the transfer lines are because your stitch will cover all the lines. Here are the new embroidery mistakes. If your design lines aren’t completely covered, choose a transfer method that can be removed when you’re done. Ceramic chalk pencils and water-soluble colored pencils can be used.
3. Trying to Hoop Everything
The first project I attempted on my embroidery machine was monogramming towels. Not knowing any better, I tried to fold the towels. I must have tried 100 times to get the towel properly aligned in the hoop and not let it come out. It was rough, but I assumed I’d get better at it in time.
When my more experienced sister saw what I was doing, she laughed at me – shocked that I would actually try to throw in the towel. But what other choice did I have???
This is when I learned how to swim with towels (and just about everything else) in the hoop. Instead of gluing the towel on top, you staple the stabilizer. You can either use a temporary spray adhesive or a sticky back stabilizer to adhere the towel to the stabilizer. So quick and easy.
4. Used Wrong Things Instead Of Stabilizers
The only time you embroider without a stabilizer: Never. A stabilizer is needed to hold your garment/cloth/towel etc in place while you are embroidering.
There are many different types of stabilizers, but the two main types are cut and tear. Generally, “if you wear it, don’t tear it.” Cut-A Stabilizer should be used on the back of anything being worn, especially if it is stretchy, ie sweatshirts, t-shirts, etc. Tearing is best for heavy-duty projects like embroidery on towels. Learn more about stabilizers for machine embroidery.
A water-soluble stabilizer is a stabilizer that dissolves when it comes into contact with water. It is used for many indoor hoop projects, making patches and freestanding laces. In addition to using the right type of stabilizer, it is also important to ensure that the stabilizer is wrapped securely. It should be flat and pulled tightly, tight enough that a coin can bounce off it.
5. Used Wrong Type Of Thread
 Embroidery thread has a different texture and looks great when stitched. There are many varieties of embroidery thread, and almost every embroidery enthusiast has a favorite brand. I would recommend not investing heavily in a brand before determining if your machine “likes” the brand. Some people swear that certain brands of thread tend to break more often on a particular machine. I, personally, do not have a strong bias towards any particular brand. Learn more about machine embroidery thread.
In addition to using embroidery thread (as opposed to regular thread), it is also very important to use embroidery bobbin thread in bobbing. The embroidery bobbin thread is thinner than normal thread which helps pull the top thread to the back of the fabric, ensuring that no bobbin thread is visible on top. Learn more about the bobbin thread of machine embroidery.
6. Picked Wrongs Types Of Applique Design
Be sensitive when it comes to design and fabric choices. Most embroidery and appliqué designs are made for standard-weight cotton fabrics with stitch density. When you try to sew these designs on other types of fabric, you may need to make some adjustments, such as adding extra layers of stabilizer. However, the reality is that some designs don’t sew well on some fabrics.
7. Not Managing Files
Almost every embroidery junkie has a ton of embroidery files. But once you start collecting a group, it’s easy to forget what’s what. Organize your files into folders that make sense to you. And then – back them up! Another great strategy is to keep all email confirmations of designs you buy in a folder so you can go back to the store and request another download if you lose the design.
8. Selecting The Wrong Fabric
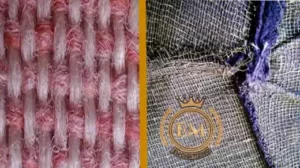 Before starting any fabric design, remember the type of embroidery you have in mind, and then decide which material can help you produce the best results for that type of stitching.
Using an embroidery fabric with a low thread count will lead to poor stitches, and a fraying fabric is also not a good option. You may compromise on consistency, and ultimately, these fabrics may not reflect the effort you will put into sewing them. Heavy-weight linen or good cotton fabric will be best for embroidery work.
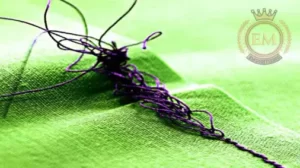
This is when the back of your thread gets tangled, but you don’t notice it, and you sew happily. If you are not careful, you can create large knots and bunches of thread behind the frame. Long threads often look tangled, which leads to annoying twists and you waste time trying to get the knots out! If you are just starting out, you should check the back of your hoop before and after. It doesn’t take much time, and in the long run, it can save you a fair amount of time. So it will save you from embroidery mistakes that are made by new embroiderers.
Conclusion
Never be afraid to make a mistake! Even professionals can make mistakes. Turning failure into a positive outcome is always a mindset. Try to transform and interpret mistakes as learning lessons, or even an opportunity to develop new strategies. So these were some of the embroidery mistakes that most novice embroiderers make.


