
Introduction:
Machine embroidery is like painting with threads. It’s up to you to take the colors on your palette and use them to paint a beautiful picture. Machine embroidery thread color blending is not only an interesting art form, but it’s also necessary to make designs that look real and complicated.
The blending of thread color method uses different thread colors to make a gradient effect that makes the embroidery design look more real and vibrant.
Most importantly, the problem is that we have to deal with restrictions that don’t apply to anyone else in the design industry because we work with needles and thread. You can use as much ink as you like on paper, but stitches on garments are another story.
If your logo has a lot of visual detail, you can embroider it by using the color blending tool. This method works well when you want to embroider a big image. It may be challenging to embroider a logo into the small area on the front of the cap.
Here, we’ll go into the fascinating topic of thread color blending in embroidery digitizing, discussing how to do it and the benefits it can bring to your embroidery projects.
By the end of this article, we have an interesting offer for all embroidery lovers. So, stay with us till the end.
Thread Color Blending In Machine Embroidery
Methods Of Thread Color Blending In Machine Embroidery
There are two main ways to blend thread colors in machine embroidery:
Manual Blending in Digitizing
Manual thread color blending is a time-consuming but ultimately satisfying technique. It takes a lot of time because this method requires applying stitches in a seemingly random pattern manually. On the other hand, it opens up almost endless artistic possibilities.
How to Execute Manual Thread Color Blending?
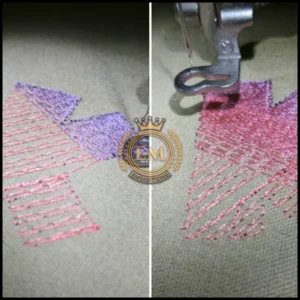
- First, use normal fill stitching to add the baseline thread color.
- Make sure that every stitch goes in the same way by changing the density of the top thread color.
- Take a look as these two applied fills come together to form a beautiful new element in your design.
- This technique can even be used to embroider with a 3D effect and improved lighting.
You can change the effect to your liking by changing the proportions of densities manually, just like when you digitize a floral embroidery design.
Besides its advantages, manual color blending takes a lot of time. So, we recommend using embroidery digitizing software and creating your embroidery designs through the machine.
Keep reading if you are interested in learning how to do thread color blending with software.
Color Blending with Digitizing Software
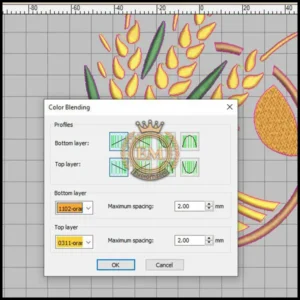
If you want to mix and match thread colors while digitizing, you’ll need a program that supports color blending. Most popular embroidery digitizing software systems offer this feature.
The first step in making a color blend is deciding on the colors that will be used. Then, you must specify the density and direction of stitches for each color. The density of the stitches will define the proportions of each color used. The direction of the stitches will affect the way the colors mix.
For instance, if you want to make a smooth gradient blend, you would use a high stitch density and a stitch direction that is the same as the blend line. Reduce the number of stitches and make sure their direction is perpendicular to the blend line to achieve a more textured end result.
Additionally, you can make various mixing effects by selecting various stitch types. You can get a smooth blend with a satin stitch or a textured blend with a zigzag stitch. We recommend using hatch embroidery digitizing software because of its user-friendliness and impressive thread color blending capabilities.
(You can learn more about hatch embroidery software by clicking here).
If you experience difficulties in digitizing embroidery with software. You can hire and expert like EMdigitizing. We provide embroidery digitizing services at an afordable prices with fast turnaround. We manually digitize your design with perfect thread colour blending techniques and turn your casual outfit into designer look.
How To Do Replicate Color Blending In Machine Embroidery Digitizing?
If your software doesn’t have built-in capabilities for creating gradated effects, you can improvise with the help of the drawing tools and some running stitches to achieve the same effect.
How? Read on!
- Digitize the baseline using different fills of thread color.
- To get the desired blending effect, digitize the other thread color using traditional fills at the intersection.
- Use a layout tool to connect the densities, adjusting the stitch length.
- Then apply running stitches following the path of your drawn lines.
- Make sure you carefully choose your colors so that they mix together smoothly.
When combining groups of colors, choosing the right colors is very important. When two or more colors blend smoothly together, the effect is seamless, yet incompatible colors can ruin it.
Digitizers who are new to color blending may want to start with simple designs and gradually work their way up to more complex ones.
Bonus Tip: Some digitizer digitizes their design by themselves and ends up with a design that looks rough. So, EMdigitzing solves this problem. We are providing blending of thread colors embroidery digitizing services without compromising quality. We also provide vector art services so you can consider us for your embroidery digitizing and printing needs.
So, click here and get your design done quickly with 24/7 customer support.
Problems With Color Blending In Embroidery Digitizing
Color blending in embroidery digitizing can be a challenging technique to master. Here are some problems with the solution:
Problem
This is a common problem when using machine embroidery to blend colors, especially for small patterns like logos on the left chest or hat designs. When colors are mixed in small places, they often look rough and unfinished.
Solution
To fix this, you could add a column stitch in the same color as the cloth around the outside of the object. This keeps the shape you want and helps hide any rough stitches.
If you’re making any major alterations to a customer’s artwork, be sure to let them know what you’re doing and why.
Example of Thread Color Blending in Action
What makes a skilled designer different is their ability to see how a design will turn out and make sure it goes smoothly through production. It is not enough to create a design that looks good on paper; the embroidery process must also go smoothly.
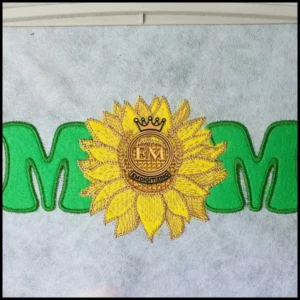
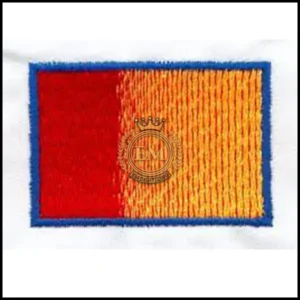
Let’s look at a more complicated example, ” logo”, to learn how the colors were digitized:
- This logo is framed with a shiny, digitally created golden line that runs vertically.
- The complete white-to-blue colour transition is digital and unaltered.
- When you look at the direction overlay, the purple line path is digitized correctly with no lift.
- The Navy blue color is horizontally digitized.
- This purple combination shows light perception.
- White highlights and thin columns around the film.
This logo is a great example of how expert digitizers use a combination of thread colors to hide their mistakes.
Final Thoughts: Thread Color Blending Needs Patience And Practice
The blending of thread colors is the heart and soul of machine embroidery. It turns ordinary designs into extraordinary masterpieces. As you experiment and practice, you’ll unlock a world of creative possibilities.
So, embrace the art of blending and watch your embroidery skills reach new heights.
Premium Offer
EMDigitizing is an experienced and reputable company offering full digitizing and vector art services to clients all around the world for their embroidery design and printing needs.
If you need anything digitized quickly and with high quality, EMDigitizing is a fantastic option. We offer first-time customers a 50% discount on all of our services, plus a free quote that is generated in less than 5 minutes.
You can ask any question about this article in the comments, and don’t forget to share it with people you think might find it useful.
Best of luck on your journey to making your creative visions a reality!
Here are two techniques for colour-blending on an embroidery machine:
- Digitizing: Make a stitch pattern in embroidery digitizing software that smoothly combines the colors.
- Manually: You can manually blend colors with your embroidery machine by using different stitch kinds, lengths, and tensions.
To make a smooth change between two or more colors, use the gradient tool in your digitizing software. You can change the direction and density of the stitches to get the look you want.
Digitizing is the act of turning an image into a digital format that a computerized embroidery machine can read and reproduce. It includes breaking the design into separate stitches, choosing the type, length, and density of each stitch, and making a path for the embroidery machine to follow.
Use graphic design software to turn the art into a vector file. Then, by importing the vector file into digitizing software, you can make stitch patterns that look like the original art.


