You are sewing smoothly, the air is clear… when all of a sudden… there is a rattling sound, your machine locks up and you cannot continue sewing. You try to peek under the fabric and the only thing you see are tangled threads. You cannot move your fabric in any direction. Now what? Why did this happen?
This article answers both of these questions. I’ll start by explaining bird nests, common problems, possible causes, and some helpful tips on how to fix them, and finally, I’ll present you with a brand new tool to help you get rid of bird nests. It will help.
Embroidery Digitizing Services
What is Birds Nesting?
Birds nesting is the accumulation of thread caught between an embroidered piece and the needle plate, often caught between the hole in the needle plate and the hook assembly. Birds nesting prevents the free movement of goods. Loops on the embroidery surface come from top tension or tension problems. Usually, either problem occurs when the polyester top thread is tensioned incorrectly. If bad enough, birds nesting and looping can reduce productivity and possibly ruin an entire embroidery project.
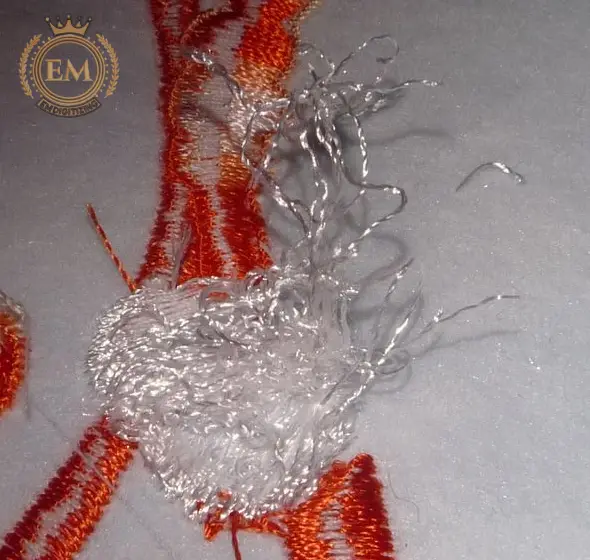
If the embroidery machine is not stopped in time, the thread bunches can pull the garment slightly through the needle hole in the throat plate and ruin it. This prevents the product from free-sliding, resulting in the garment falling out of the derrick hoop. Nothing eats performance more than a bland item with only half of the embroidery design.
Common Causes of Birds Nesting
The main source of birds nesting or looping is incorrect bobbin insertion or running a threaded bobbin or embroidery machine without a bobbin. Running your system without a bobbin isn’t strictly bird hunting, though. Here are some common reasons why birds build nests.
1. Your Machine is Incorrectly Threaded
Many times I can solve my bird’s nest problems by completely resetting my machine. For example, if the thread is not held securely between the tension discs, you will get unsatisfactory results.
I know this may sound evident, but take a look at your manual. How does the manufacturer specify the correct threading for your machine? You might get some insight. Some of the assumptions you may have made about threading your machine may be wrong.
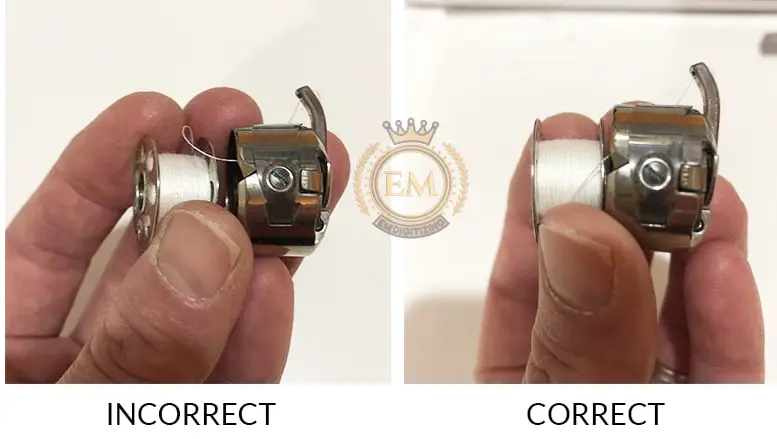
2. Wrong Orientation of your Bobbin
Check to see if your bobbin is upside down. One way to tell if your bobbin is properly oriented inside the bobbin case is to examine the shape of the thread tail. That tail must look like a “p” and not a “q”.
3. Wrong Orientation of the Needle
In my embroidery machine, the flat side of the needle should face the back of the machine. If you insert my needle the wrong way, it can cause problems like a bird’s nest.
4. Dirty Threading Path
Stray threads and dust bunnies caught in the thread path at the top of the machine can cause hanging embroidery threads and bird nests. You can sometimes remove these bits of string and dust by “flossing” your embroidery machine with unwaxed dental floss. Be sure to floss well inside your tension discs.
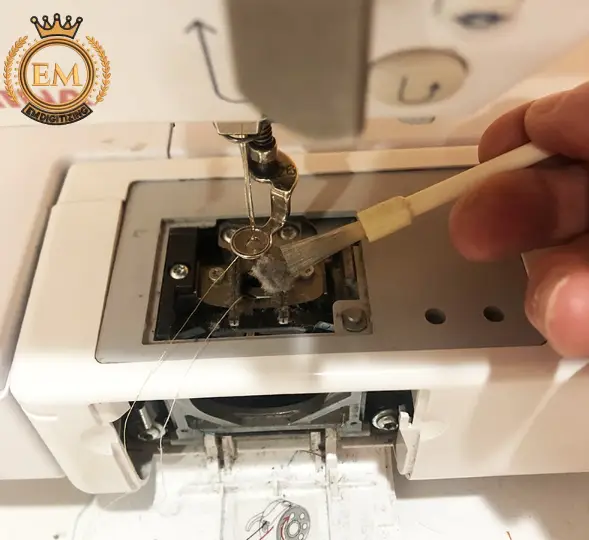
5. Dirty Bobbin Case
Remove the face plate from the bobbin and brush it with a makeup brush (or the brush that came with your machine). Then remove the bobbin cage completely and brush that area as well.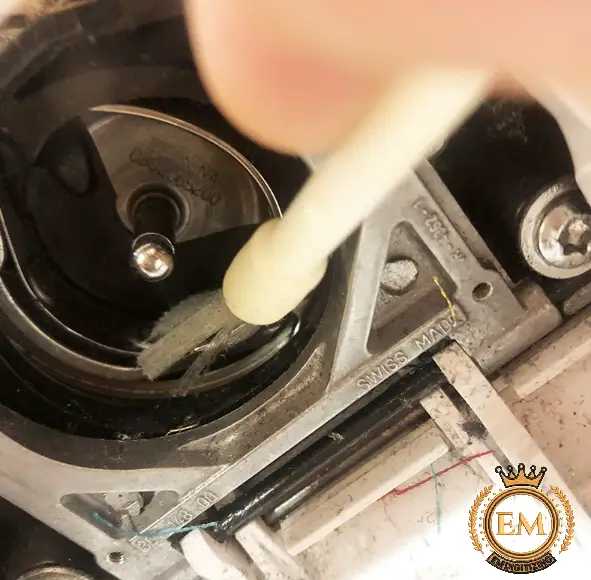
6. A Burr or a Nick on the Bobbin Case
Check the bobbin case and plate for nicks or cracks. These little divots can ruin the quality of your embroidery. Although they may be hard to see, you can feel them. So, run your finger on the bobbin plate and pull out the bobbin case and also run your finger on its edge. If there is a bump, gently file with a nail file to smooth the edge. If you are unable to correct the fault, I would suggest ordering a replacement part for your machine.
7. Thread Stuck inside the Machine
Sometimes threads can get stuck inside your machine which can cause problems while you are embroidering. To find these sneaky buggers, you’ll need to take off the front and possibly side covers.
Look to the right of the take-up lever. There is a movable joint where the thread can wrap. Next, clean up the area with tweezers and an X-Active (or craft) knife. To the right of this joint is the tension disc. Remove any remaining thread between the discs so that your embroidery thread runs properly through the tension area.
8. A Bent Needle
If the needle runs on a hard surface, it can easily bend causing problems with stitching later, ie a bird’s nest city! Embroidery machine needles are cheap. So, when in doubt – just change your needle.
9. Thread Stuck in the Bobbin Case
Place the business card under the tension spring on the bobbin. Fuzz and strings can get caught in there which can cause birds nesting.
10. Old or Poor Embroidery Thread
Thread can have a big impact on the quality of your embroidery stitch. An old thread that has become dry and frayed, or spools that are covered in lint, can be prone to birds nesting. Also, really cheap yarn can be more prone to problems. Find out what type of embroidery thread works well on your machine, then stick to that brand when buying thread in the future.
Tips for Solving Birds Nesting Problems
- Looping is usually caused by thread tension that is too loose. It can be above or below the design. Both the bobbin and the tensioner can be the culprit. Check if the problem is due to the tensioners by turning the tensioner knobs to the right to tighten. This may explain the looping problem. Must be checked the bobbin for proper tension.
- Check the tensioner knobs for looseness on the tensioner post. The tensioner post will be threaded and have a machined-out slot halfway up the shaft.
- If the tensioner knob is too loose, remove the knob first. Carefully insert the blade of a flathead screwdriver into the slot. Gently spread it out a bit and reinstall the knob. Recheck knob tightness.
- Design density can affect both looping and birds nesting. Tight embroidery stitches may be dense and the needle may have difficulty penetrating the fabric. Tightness will cause the thread to pull from the needle. Refer to the user manual for your specific embroidery system for more information on the correct design density. The density of small text can also cause problems.
- When sewing small letters and words, many manufacturers recommend 4.2 density as a default. This can be too much for letters smaller than ½”.
- The size of the eye of the needle can also affect the nesting and looping of birds. With a very high stitch density or overly stretchy fabric, you may want to switch to a larger-eye needle. For example, if using a 70/10 size needle, consider switching to a 75/11 or 80/12 needle. Needles with large eyes allow the thread to pass easily through the eye of the needle.
- The most popular embroidery thread is 40 gauge. If you are using a 30 gauge line, you will need to use a needle with a larger eye. Consider 80/12. When working with metallic threads, consider using an 80/12 or 90/14 needle if your garment allows.
- Check to see if you have the most up-to-date thread guides, to find out which smoothness of movement is known for specific embroidery threads. Call Coleman & Company for more information.
Preventing Birds Nesting
Of course, it’s always best to avoid bird’s nests! It’s certainly better than recovering after the fact. Four ways to prevent birds nesting:
- Pay attention to all threading and tension.
- Adjust any problems with flagging.
- Observe the embroidery process, and look for stitch quality, machine noise, or any unusual changes. Stop the machine instantly to avoid damaging the garment.
- Note the “thread break” messages. This may not be an actual thread break, but an early warning of a bird’s nest.
While you may not be able to avoid every instance of a bird’s nest, with attention to detail in the embroidery process, you can certainly prevent it from becoming a regular occurrence and seriously disrupting your production flow.
Conclusion
I am sure this article will help you understand the reasons for birds nesting in the machine embroidery and how can you fix and avoid them. There are many important tips to fix the birds nesting, but these are the most important tips fix them. I hope this will helps you guys!
Birds nesting is formed when clumps of thread rise under the needle plate, causing thread breaks, stitches, and uneven tension. This is usually due to the tension balance being out of whack or the top thread not being properly threaded.
A tight bobbin tension, along with too loose a needle thread tension, can cause birds nesting. Flagging occurs due to the hoop bouncing up and down during sewing. If the fabric is tied too loosely, the fabric may slip or stretch in the hoop.
Sewing machine manufacturers recommend that you don’t mess with your bobbin thread tension too much, but you should adjust your upper thread tension if you keep adding thread to the bottom of your fabric. If your tension is too tight, it can stretch and break your thread.
Pull up sharply on the thread. The thread should loosen slightly and the bobbin case should drop an inch or two. If the thread unwinds without resistance and the case slides to the floor, your bobbin tension is too loose. If the bobbin case does not move, your bobbin tension is too tight.
Looping at the top means the needle tension is too loose. Change your needle. The golden rule for needle selection is to use the smallest sharp needle that can be pulled into the fabric without damaging the thread, fabric, or needle. Change your thread.
