Quick Secret Tips To Halftone Screen Printing

Quick Secret Tips To Halftone Screen Printing

Introduction:

In this article, we will explore some quick secret tips to help you master the art of halftone screen printing, enabling you to create visually stunning and professional-looking halftone prints.

Quick Secret Tips To Halftone Screen Printing

Quick Secret Tips To Halftone Screen Printing

What Is Halftone?

What Is Halftone
What Is Halftone

Halftone printing is a versatile technique that allows for the reproduction of intricate details, shades, and gradients using a limited number of ink colors. It is widely used in various applications, including apparel printing, halftone art prints, and promotional materials.

Tips To Halftone Screen Printing

Now that you know what is a halftone screen printing, let’s move on to some amazing tips for half tone printing:

Understanding Halftone Printing

Understanding Halftone Printing

To excel in halftone printer, it’s essential to understand the basic concept behind the process. Halftone images printing involves breaking down continuous tone images into a series of small dots that vary in size and density. These halftone dots, when printed together, create the illusion of different shades and gradients. The key to successful halftone printing lies in finding the right balance between printing dots size, dot frequency, and printing substrate.

Choosing the Right Halftone Pattern

Choosing the Right Halftone Pattern

Selecting the appropriate halftone pattern is crucial for achieving desired print results. Different halftone patterns, such as round dot, elliptical dot, and square dot, produce varying visual effects. Round dots are commonly used for general printing, while elliptical dots can create smoother transitions. Square dots, on the other hand, provide a more traditional and mechanical appearance. Experimentation and test prints can help you determine the best halftone pattern for your specific screen printing project.

Optimal Image Preparation

Optimal Image Preparation

Proper image preparation is essential for successful halftone screen printing. Begin by adjusting the image’s contrast and levels to enhance details and ensure a good tonal range. Next, convert the image to grayscale and adjust its resolution to match the intended print size. Consider using image editing software like Adobe Photoshop to precisely control dot size, frequency, and angle. Remember to test print and fine-tune your settings to achieve the desired halftone effect.

Proper Screen Exposure

Proper Screen Exposure

Accurate screen tones exposure is vital to obtain crisp and sharp halftone prints. Ensure that your screen emulsion is properly coated, evenly distributed, and free from debris. Use a quality exposure unit and follow the manufacturer’s guidelines for optimal exposure time. Underexposure can result in weak dots and poor image definition, while overexposure may cause dots to merge or lose detail. Regularly check and calibrate your exposure setup to maintain consistent print quality.

Selecting the Right Mesh Count

Selecting the Right Mesh Count

The mesh count of your screen plays a significant role in dotted halftone screen printing. Higher mesh counts produce finer details and smaller dots, while lower mesh counts are better suited for larger dots and heavier ink deposits. Consider the substrate texture and ink viscosity when selecting the mesh count. It’s important to strike a balance to ensure optimal ink coverage and dot penetration without clogging the screen or sacrificing print quality.

Proper Ink Application

Proper Ink Application

Achieving consistent and vibrant halftone prints requires careful ink application. Use a squeegee with the appropriate hardness, ensuring consistent pressure and angle throughout the print stroke. Maintain a proper ink-to-screen ratio to prevent over- or under-inking, which can affect dot formation and print clarity. Test prints and adjustments may be necessary to achieve the desired ink coverage and dot saturation.

Dot Shape Experimentation:

Dot Shape Experimentation

Don’t limit yourself to traditional round, elliptical, or square dots. Try experimenting with different dot shapes, such as diamonds or triangles, to create unique visual effects and textures in your prints.

Halftone Density Control:

Halftone Density Control

Adjusting the density of your halftone dots can significantly impact the overall appearance of your prints. Increase the dot density for darker areas to add depth and richness, while decreasing the density in lighter areas to achieve subtle gradients.

Substrate Considerations:

Substrate Considerations

Keep in mind that different substrates may require specific adjustments in your halftone printing process. Factors such as surface texture, color, and absorption rate can influence ink adhesion and dot clarity. Test prints on various substrates to determine the optimal settings for each.

Halftone Angle Variation:

Halftone Angle Variation

Varying the halftone angles in multi-color prints can help reduce moiré patterns and improve overall print quality. Experiment with different angle combinations to find the most visually appealing and balanced results.

Proper Screen Cleaning and Maintenance:

Proper Screen Cleaning and Maintenance

Regularly clean and maintain your screens to ensure optimal print quality. Remove excess ink, emulsion residue, and debris from the screen surface to prevent clogging and ensure consistent dot formation.

Temperature and Humidity Control:

Temperature and Humidity Control

Environmental conditions can affect the performance of your inks and emulsions. Maintain a controlled printing environment with stable temperature and humidity levels to minimize ink drying issues, dot distortion, or screen drying during the printing process.

Fine-Tuning Halftone Parameters:

Fine-Tuning Halftone Parameters

Pay attention to the details and continually fine-tune your halftone parameters. Adjust dot size, frequency, and angle based on the specific image and printing requirements to achieve the desired visual impact.

Post-Print Inspection:

Post-Print Inspection

After printing, carefully inspect your halftone prints for any imperfections or inconsistencies. Look for issues such as incomplete dot formation, ink bleeding, or misregistration. Address any problems promptly to improve future print runs.

Continuous Learning and Practice:

Continuous Learning and Practice

Halftone screen printing is an art that requires practice and ongoing learning. Stay updated with new techniques, tools, and industry trends. Experiment with different combinations and approaches to expand your knowledge and refine your skills.

Halftone Size Variation:

Halftone Size Variation

Experiment with varying the dot size within your halftone pattern. Using different dot sizes can add visual interest, create texture, and enhance the overall dynamic range of your prints.

Gradient Control:

Gradient Control
Gradient Control

Achieving smooth gradients in halftone prints requires careful attention. Fine-tune the dot size and spacing in areas of transition to ensure seamless and visually appealing gradients.

Underbase Considerations:

Underbase Considerations

When printing on dark or colored substrates, consider using an underbase layer to enhance the vibrancy of the halftone prints. Properly align the underbase with subsequent layers to maintain accurate registration.

Ink Mixing:

Ink Mixing
Ink Mixing

Explore the world of custom ink mixing to create unique colors and tones for your halftone prints. Experiment with different ink combinations to achieve the desired visual effects and expand your creative possibilities.

Test Prints and Calibration:

Test Prints and Calibration

Regularly conduct test prints to evaluate the accuracy of your halftone setup. Make necessary adjustments to dot size, density, and angles based on the results. Calibrating your equipment and workflow ensures consistent and reliable printing.

By incorporating these tips into your halftone picture screen printing process, you can further refine your technique, expand your creative possibilities, and consistently produce outstanding prints that stand out from the crowd. Remember, practice and experimentation are key to mastering this versatile printing method.

Conclusion:

Halftone screen printing opens up a world of possibilities for creating visually captivating prints. By understanding the fundamental principles and applying these quick secret tips, you can master the art of halftone printing and produce high-quality, professional results. Remember to experiment, test, and fine-tune your process to achieve the desired effects. With practice and attention to detail, you can take your halftone screen printing to the next level and create stunning prints that captivate viewers and leave a lasting impression.

If you’re in need of personalized logo embroidery digitizing services, EM DIGITIZING is the ultimate solution. We specialize in delivering top-notch embroidery logo digitizing services with uncompromising quality. Take advantage of our exclusive offer of 50% off on all our services for first-time customers. Request a free quote today, and we’ll promptly reach out to you.

We hope this article has provided valuable insights for you. Should you have any questions or queries regarding the content, please don’t hesitate to leave a comment. Thank you for taking the time to read!

You may also like

The halftone process in screen printing involves converting continuous tone images into patterns of small dots. These dots vary in size and density to create the illusion of shades and gradients in the printed image. This technique allows for the reproduction of photographic images using limited ink colors.

The best halftone for screen printing depends on various factors such as the desired image detail, the type of substrate, and the printing equipment used. Common halftone options include round dot, elliptical dot, and square dot. Experimentation and testing can help determine the most suitable halftone for achieving desired print results.

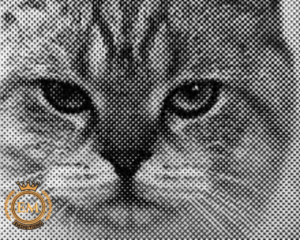
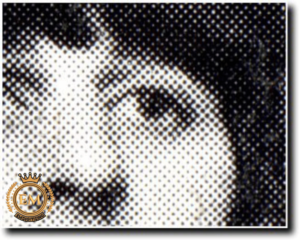
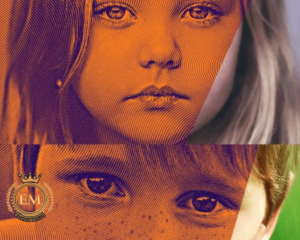
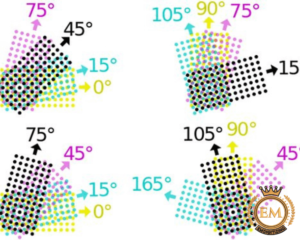
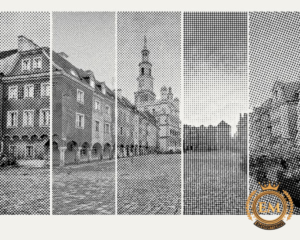
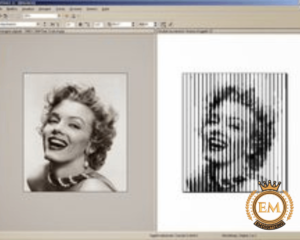
To create a halftone for printing, specialized software like Adobe Photoshop can be used. The process involves converting the original continuous tone image into a series of small dots varying in size and spacing. Software settings, such as dot size, frequency, and angle, can be adjusted to achieve the desired halftone effect for the specific printing requirements.

Using halftone printing provides two key benefits: Firstly, it allows for the reproduction of continuous tone design images, including gradients and shades, using a limited number of ink colors. Secondly, halftone printing enables precise control over dot size and density, resulting in accurate representation of details and smoother transitions in the printed image.

Common types of halftones include round dot, elliptical dot, and square dot. Each type has its characteristics and can produce different visual effects in the printed image. Additionally, variations in dot size, spacing, and angle can be used to create customized halftone patterns that suit specific printing requirements and artistic preferences.