
Cómo planchar sus parches de bordado personalizados
En este articulo, discutiremos el proceso de planchado de sus parches de bordado personalizados. Los parches bordados son una forma popular de añadir personalidad y estilo a las prendas., bolsas, sombreros, y más. Siguiendo los sencillos pasos que se describen a continuación, Puedes aplicar fácilmente tus parches personalizados a cualquier superficie de tela usando solo una plancha.. Esta guía te ayudará a conseguir un resultado profesional y duradero., asegurando que sus parches bordados personalizados permanezcan en su lugar y luzcan geniales en los años venideros..
Cómo planchar tus parches de bordado personalizados
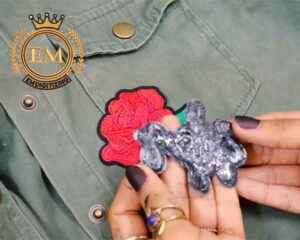
Parches de bordado personalizados

Los parches bordados existen desde hace muchos años., y siguen siendo una forma popular de personalizar la ropa., bolsas, sombreros, y otros artículos de tela. Si recientemente adquirió parches bordados personalizados para planchar y desea adjuntarlos a su artículo favorito, Quizás te preguntes cómo hacerlo.
Afortunadamente, planchar un parche es un proceso sencillo que puedes realizar en casa usando solo unas pocas herramientas simples. Echemos un vistazo a algunos de los pasos necesarios para planchar tu personalizado. parches bordados, para que puedas lucir tu nuevo accesorio con orgullo!
Lo que necesitará para personalizar parches con logotipos planchados:
- Una prenda de tela a la que deseas colocar el parche.
- Parches bordados personalizados
- Un metal
- una tabla de planchar
- Una toalla o paño fino
- una superficie dura
Paso 1: Cómo preparar la prenda de tela y el parche
Antes de que empieces, it’;Es importante asegurarse de que la prenda de tela a la que desea colocar el parche esté limpia y seca.. Si no es así, Lávelo y séquelo antes de continuar.. Esto asegurará que el parche se adhiera correctamente a la tela y permanezca en su lugar durante mucho tiempo..
Una vez que la prenda de tela esté limpia y seca, Coloque el parche de bordado personalizado en el área donde desea colocarlo.. Puedes usar un alfiler para asegurarlo en su lugar temporalmente., asegurándose de que esté centrado y recto.
Paso 2: Calentar la plancha
Now it’;Es hora de calentar la plancha.. Conéctelo y ajústelo a la temperatura requerida para la prenda de tela a la que va a colocar el parche.. Si no estás seguro, consult the fabric’;etiqueta de cuidado. Espere a que la plancha se caliente antes de continuar..
Paso 3: Preparando la toalla
Coloque una toalla fina o un paño encima del parche.. Esto protegerá el parche del calor de la plancha y evitará cualquier daño a la tela.. It’;Es importante elegir una toalla o un paño fino para que el calor aún pueda penetrar hasta el parche..
Paso 4: Planchar el parche
Coloque la plancha encima de la toalla y presione firmemente durante aproximadamente 15 segundos. Asegúrese de aplicar una presión uniforme en todo el parche., incluyendo los bordes. The amount of time required to iron on the patch may vary depending on the manufacturer’;instrucciones, Así que asegúrate de comprobarlo antes de comenzar..
Once you’;He planchado el parche durante el tiempo requerido., Levante con cuidado la plancha y la toalla para comprobar que el parche se ha adherido correctamente.. If it hasn’;t, puedes repetir el proceso, asegurándose de aplicar más presión o calor según sea necesario.
Paso 5: Planchar la parte posterior de la prenda de tela
Una vez que el parche esté adherido al frente de la prenda de tela, it’;Es hora de planchar la espalda para asegurar una unión fuerte.. Dale la vuelta a la prenda de tela y vuelve a colocar la toalla encima del parche.. Presione firmemente con la plancha para obtener más 15 segundos.
Paso 6: Comprobando el parche
Después de planchar el parche, Retire la toalla y verifique si el parche está firmemente adherido.. Si no es así, repetir el proceso, asegurándose de aplicar más presión o calor según sea necesario. Si el parche se ve bien, Déjelo enfriar durante unos minutos antes de usar o lavar la prenda de tela..
Paso 7: Últimos retoques
Felicidades, Has planchado con éxito tu personalizado. parche bordado! Dependiendo de tu preferencia, puede optar por agregar puntos adicionales alrededor de los bordes del parche para asegurarlo aún más. Alternativamente, quizás quieras dejarlo como está para un look más informal..
Cómo limpiar parches bordados?
Los parches bordados pueden añadir mucha personalidad y estilo a tu ropa o complementos., pero también pueden ensuciarse o mancharse con el tiempo. Aquí se explica cómo limpiar parches bordados.:
Limpieza de manchas:
Si su parche tiene una pequeña mancha o marca, Puedes intentar limpiarlo con un paño húmedo o una esponja.. Utilice un jabón o detergente suave y evite frotar demasiado fuerte el parche., ya que esto puede causar que el bordado se dañe.
Lavarse las manos:
Para parches más grandes o más delicados, lavarse las manos suele ser la mejor opción. Llene un fregadero/lavabo con agua caliente suave y agregue un detergente. Agite suavemente el agua para crear espuma., luego agregue el parche y gírelo en el agua. Enjuague bien el parche con agua fría y exprima suavemente el exceso de agua..
Lavado a máquina:
Es posible que algunos parches de bordado personalizados se puedan lavar a máquina., but it’;Es importante revisar la etiqueta de cuidado y las instrucciones antes de intentar esto.. Utilice un ciclo suave y un detergente suave., y asegúrese de colocar el parche en una bolsa de malla para la ropa sucia para protegerlo del roce con otras prendas o accesorios..
Secado al aire:
Después de lavar el parche, Evite usar secadora o plancha para secarlo.. En cambio, colóquelo sobre una toalla o rejilla para secar y déjelo secar al aire por completo.. Evite colgar el parche, ya que esto puede causar que se estire o se distorsione.
Limpieza profesional:
Para parches bordados muy delicados o valiosos, it’;A menudo es mejor que los limpie un profesional.. Busque una tintorería o un servicio de lavandería que tenga experiencia con el bordado y asegúrese de informarles sobre cualquier inquietud o instrucción de cuidado especial..
Consejos para planchar tus parches de bordado personalizados:

Echemos un vistazo a algunos de los consejos sobre sus parches termoadhesivos personalizados.:
Prueba el calor:
Antes de planchar el parche., Pruebe el calor de su plancha en una pequeña, área discreta de la prenda de tela. Esto le ayudará a evitar dañar accidentalmente la tela con demasiado calor..
Utilice una superficie plana:
Asegúrate de planchar en plano., superficie estable. Esto le ayudará a aplicar una presión uniforme sobre el parche y garantizar que se adhiera correctamente a la tela..
Evite el vapor:
Al planchar sobre el parche, asegúrese de apagar la función de vapor en su plancha. El vapor puede hacer que el parche se mueva o se mueva., lo que dificulta su fijación adecuada a la tela.
Recortar hilos sueltos:
Antes de planchar el parche., asegúrese de recortar los hilos sueltos alrededor de los bordes del parche. Esto ayudará a evitar que los hilos queden atrapados debajo del parche y provoquen que se levante con el tiempo..
Evite tirar de la tela:
Al colocar el parche en la tela, Evite tirar demasiado de la tela.. Esto puede hacer que la tela se estire o se deforme., que puede afectar la apariencia del parche.
Considere coser el parche:
Si desea asegurarse de que sus parches de bordado personalizados permanezcan en su lugar durante mucho tiempo, Es posible que desees considerar coserlo sobre la prenda de tela además de plancharlo.. Esto puede ayudar a brindar soporte adicional y evitar que el parche se suelte..
liquidación:
Esta fue una guía sencilla sobre cómo planchar tus parches de bordado personalizados.. Recuerda seguir los pasos atentamente y tomar nota de los consejos para asegurar una aplicación exitosa.!
If you’;Estamos buscando bordado profesional. servicios de digitalización de logotipos, DIGITALIZACIÓN EM es una gran opción a considerar. Ofrecemos servicios de alta calidad e incluso ofrecemos un descuento para clientes nuevos.. No dude en comunicarse con nosotros para obtener una cotización gratuita.
Esperamos que haya encontrado este artículo informativo y útil..
Sí, Los parches son más baratos que los bordados porque se fabrican mediante un proceso diferente y se pueden producir en mayores cantidades a un costo menor.. Sin embargo, en última instancia depende de lo específico diseño de bordado y proceso de fabricación utilizado.
El coste de los parches personalizados dependerá de varios factores, como el tamaño, diseño, cantidad, y materiales utilizados. Generalmente, cuanto más complejo sea el diseño y menor la cantidad, cuanto mayor sea el costo. Los precios pueden variar desde unos pocos dólares por parche hasta diseños simples y grandes cantidades., hasta varios dólares por parche para diseños más complejos y cantidades más pequeñas.
Sí, Puedes pegar parches bordados a la tela usando pegamento o adhesivo para tela..
La mejor puntada para parches de bordado depende del diseño y del efecto deseado.. Algunas puntadas populares para parches incluyen puntada satinada., lo que crea un relleno suave y sólido, y puntada de contorno, que perfila el diseño y crea un efecto elevado. Otros puntos como punto de cadena., puntada corriente, y se pueden usar nudos franceses para agregar textura y detalles..
Los parches bordados pueden permanecer colocados durante mucho tiempo si se fijan correctamente a la tela mediante costura o plancha.. Coser es el método más seguro., pero planchar también puede funcionar bien para muchos parches.


