
Bordar gorros con una máquina de bordar es una forma divertida y creativa de agregar diseños personalizados a tus sombreros.. Si desea mostrar su logotipo favorito, crear un regalo único, o simplemente añade un toque de estilo, Usar una máquina de bordar hace que el proceso sea rápido y fácil..
En este articulo, Te guiaremos paso a paso en el proceso de bordar gorros., desde reunir los materiales necesarios hasta configurar su máquina de bordar.
Asi que, let’;empezar!
Cómo bordar gorros- Proceso completo
Reunir los materiales y equipos necesarios
Antes de sumergirnos en el mundo del bordado de gorros, it’;Es importante tener a mano los materiales y equipos adecuados..
Elegir el gorro adecuado
Al seleccionar un gorro para bordar, opte por un estilo hecho de tela que pueda soportar el proceso de costura sin distorsionar el diseño.
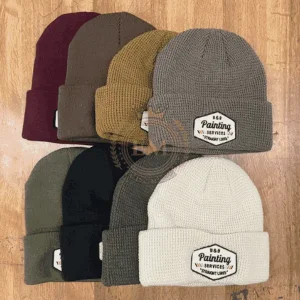
Busque sombreros que tengan un tejido apretado y estén hechos de materiales como algodón o acrílico..
Suministros esenciales para bordar
Para bordar con éxito tu gorro, you’;Necesitará algunos suministros clave. Estos incluyen un Maquina de bordar (por supuesto!), hilo de bordar, estabilizador (para brindar soporte al sombrero durante el proceso de bordado), agujas de bordar, y tijeras.
Además, it’;Es útil tener una herramienta de marcado para delinear dónde desea colocar el bordado..
Preparar el gorro para bordar
Antes de empezar a coser, it’;Es importante preparar tu gorro adecuadamente. Este paso es crucial para garantizar que su bordado luzca prolijo y profesional..
Lavar y planchar el sombrero
Primero, lava tu gorro y presiónalo para lograr una superficie limpia y lisa.. Esto eliminará cualquier suciedad o arrugas que puedan interferir con el proceso de bordado..
Marcar la ubicación del bordado
Usando una herramienta de marcado, delinea ligeramente el área del gorro donde deseas colocar diseño de bordado ser colocado.
Esto actuará como guía cuando coloques el sombrero en la máquina de bordar más adelante..
Configurar la máquina de bordar y elegir el diseño
Now it’;Es hora de configurar su máquina de bordar y prepararse para la magia de la costura.!
Familiarizarse con los controles de la máquina de bordar
Antes de sumergirnos en el proceso de bordado, Tómese un momento para familiarizarse con los controles y funciones de su máquina de bordar.. Entender cómo enhebrar la máquina correctamente., cambiar agujas, ajustar la tensión, y navegar por las configuraciones disponibles.
Este conocimiento hará que el proceso de configuración sea más sencillo y le ayudará a evitar errores innecesarios..
Cargando el diseño apropiado en la máquina de bordar
Selecciona un diseño que se adapte a tu estilo personal y complemente el gorro.. Muchas máquinas de bordar le permiten cargar diseños desde su computadora o conectarse a bases de datos de diseños de bordado..
Choose a design compatible with your machine’;s format and transfer it to the machine’;s memoria o área de trabajo.
Ajustar el tamaño y la ubicación del diseño de los gorros
Use the embroidery machine’;s software para ajustar el tamaño del diseño y colocarlo correctamente en el gorro. Asegúrese de que el diseño encaje dentro del área marcada de colocación del bordado.. Tenga en cuenta el tamaño del sombrero y el impacto visual deseado del diseño..
Once you’;Estoy satisfecho con los ajustes., Prepare la máquina para bordar colocando el aro sombrero con estabilizador.
Colocar el gorro en un aro para bordar
Cuando se trata de bordar gorros, El primer paso es colocar correctamente el sombrero..
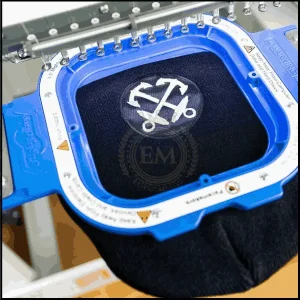
Esto garantiza la estabilidad durante el proceso de bordado y ayuda a crear un acabado limpio y profesional..
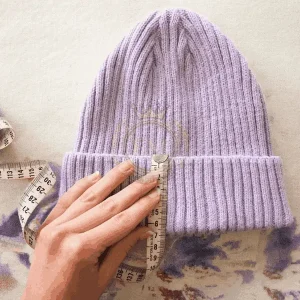
Seleccionar el tamaño de aro correcto para los gorros
No todos los tamaños de aros son iguales, y elegir el adecuado para tu gorro es fundamental. demasiado pequeño, y corres el riesgo de distorsionar el sombrero o el diseño; demasiado grande, y es posible que tenga dificultades para lograr un ajuste perfecto para bordar.
Busque un tamaño de aro que coincida con la circunferencia de su gorro y proporcione un agarre seguro..
Colocar correctamente el gorro para garantizar la estabilidad con el gorro
Ahora que tienes el tamaño de aro correcto, it’;Es hora de colocarse el gorro.. Comience dándole la vuelta al sombrero para asegurarse de que el bordado quede en el exterior.. Coloca el aro interior dentro del sombrero., asegurándose de que quede ajustado contra la tela.
Después, Coloca el aro exterior sobre el sombrero., alineándolo con el aro interior. Empuje suavemente hacia abajo para asegurar el sombrero entre los aros., asegurándose de que esté tenso pero no estirado.
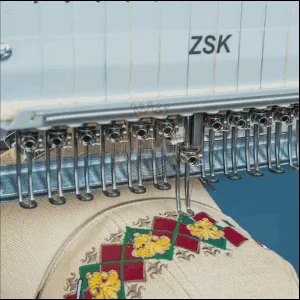
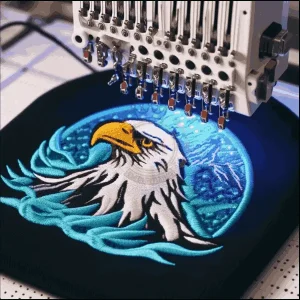
Bordar el diseño del gorro
aro de forma segura, it’;Es hora de darle vida a tu diseño..
Enhebre la máquina de bordar con el color apropiado
Antes de empezar a bordar, asegúrese de enhebrar su máquina de bordar con el color apropiado. Esto podría parecer una obviedad, pero confía en mí, we’;todos hemos tenido esos momentos
cuando accidentalmente enhebramos la máquina con el color incorrecto y solo nos dimos cuenta después de completar el diseño (ups).
Así que ahórrese el dolor de cabeza y vuelva a comprobar el color del hilo antes de empezar..
Realizar una puntada de prueba para garantizar la tensión y colocación adecuadas
A nadie le gustan las sorpresas, especialmente cuando se trata de bordado. Para evitar posibles desastres, realice una puntada de prueba en un trozo de tela o en el gorro mismo (if you don’;No importa una pequeña nota de prueba) para garantizar que la tensión y la colocación sean correctas.
Esto le ayudará a detectar cualquier problema antes de que arruine su diseño..
Bordar el diseño del gorro con cuidado y precisión
Ahora viene la parte divertida.! Con todo configurado y validado., it’;Es hora de dejar que tu máquina de bordar haga su magia.. Tómalo lento y constante, permitiendo que la máquina haga su trabajo mientras usted admira los movimientos suaves y precisos.
Asegúrese de monitorear el proceso para asegurarse de que todo avance sin problemas..
Toques finales e instrucciones de cuidado para gorros bordados
Una vez terminado el bordado, you’;ya casi termino! Solo unos pocos pasos más para agregar esos toques finales y mantener tu gorro luciendo lo mejor posible..
Quitar el gorro de la máquina de bordar y del aro
Retire con cuidado el gorro de la máquina de bordar y del bastidor.. Tome su tiempo, ya que apresurarse puede hacer que los hilos se enganchen o que el sombrero se deforme.
Suelta suavemente el aro y retíralo del sombrero., tener cuidado de no tirar o tirar con demasiada fuerza.
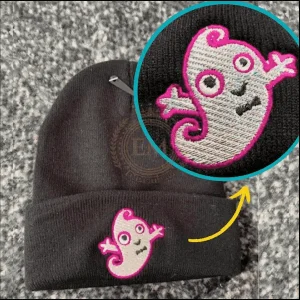
Recortar el exceso de hilos e inspeccionar el trabajo de bordado
Now it’;Es hora de arreglar un poco tu gorro bordado. Tómate un momento para inspeccionar tu trabajo de bordado., asegurando que el diseño esté nítido y libre de hilos sueltos. Si detectas algún hilo suelto, use un par de tijeras afiladas para recortarlas con cuidado, teniendo cuidado de no cortar la tela.
Un poco de atención al detalle aquí puede marcar una gran diferencia en la presentación final..
Instrucciones de cuidado adecuadas
Por último, let’;Hablemos sobre cómo mantener tu gorro bordado en óptimas condiciones.. Para preservar la integridad del diseño., it’;Lo mejor es lavar el sombrero a mano en agua fría con un detergente suave..
Evite el uso de productos químicos agresivos o lejía., ya que pueden dañar el bordado y la tela. Después del lavado, Dale nueva forma al sombrero y déjalo secar al aire por completo..
Y ahí lo tienes! Siguiendo estas instrucciones paso a paso, you’;Estaré bordando gorros como un profesional en poco tiempo. Así que elige tu diseño favorito, enciende tu máquina de bordar, y prepárate para darle un toque personal a tu guardarropa de invierno.
feliz bordado!
EMdigitalización: Experto en digitalización de bordados a su servicio
Si estás interesado en algún tipo de proyecto de bordado., entonces EMdigitizing es la mejor opción para ti. Ofrecemos digitalización de bordados y servicios de arte vectorial con un tiempo de respuesta rápido. También puedes visitar y consultar nuestra web así como nuestros mejores servicios..
También ofrecemos una gran 50% Descuento en todos nuestros servicios para nuestros respetados clientes primerizos.. También ofrecemos cotizaciones gratis generado en tan solo 5 minutos.
Deberías aprovechar esta oferta por tiempo limitado y llevar tu proyecto de bordado al siguiente nivel con EMdigitizing.
Si tienes alguna consulta sobre este tema, puedes preguntarles. Gracias por tomarse el tiempo de leer este artículo..
feliz bordado!
Preguntas frecuentes:
Sí, puedes bordar un gorro. Implica coser diseños o patrones en la tela., Generalmente se hace con aguja e hilo..
para bordar un sombrero, Por lo general, usas un aro para mantener la tela tensa y luego coses tu diseño con hilo de bordar., siguiendo un patrón o a mano alzada.
El bordado de sombreros se refiere al proceso de coser diseños decorativos en sombreros., a menudo usa hilos de colores para crear patrones o texto.
Bordar sombreros puede resultar complicado debido a su forma curva y su material grueso, pero con práctica y las herramientas adecuadas, se vuelve manejable.
Sí, puedes bordar tu propia ropa. It’;Es una forma creativa de personalizar prendas utilizando habilidades básicas de costura y materiales de bordado..


