
Das Besticken von Beanie-Mützen mit einer Stickmaschine ist eine unterhaltsame und kreative Möglichkeit, Ihrer Kopfbedeckung individuelle Designs hinzuzufügen. Ob Sie Ihr Lieblingslogo präsentieren möchten, Kreieren Sie ein einzigartiges Geschenk, oder fügen Sie einfach einen Hauch von Flair hinzu, Die Verwendung einer Stickmaschine macht den Vorgang schnell und einfach.

In diesem Artikel, Wir führen Sie Schritt für Schritt durch den Prozess des Bestickens von Beanie-Mützen, Vom Sammeln der notwendigen Materialien bis zum Einrichten Ihrer Stickmaschine.
So, let’;Fangen Sie an!
So besticken Sie Beanie-Mützen- Vollständiger Prozess
Sammeln der notwendigen Materialien und Ausrüstung
Bevor wir in die Welt der Mützenstickerei eintauchen, it’;Es ist wichtig, die richtigen Materialien und Geräte zur Hand zu haben.
Die richtige Beanie-Mütze auswählen
Bei der Auswahl einer Beanie-Mütze zum Besticken, Entscheiden Sie sich für einen Stil aus Stoff, der dem Nähvorgang standhält, ohne das Design zu verzerren.
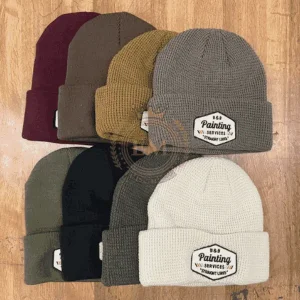
Suchen Sie nach Hüten, die dicht gewebt sind und aus Materialien wie Baumwolle oder Acryl bestehen.
Unverzichtbares Stickzubehör
Um Ihre Beanie-Mütze erfolgreich zu besticken, you’;Ich brauche ein paar wichtige Vorräte. Dazu gehört ein Stickmaschine (Natürlich!), Stickgarn, Stabilisator (um den Hut während des Stickvorgangs zu stützen), Sticknadeln, und Schere.
Zusätzlich, it’;Es ist hilfreich, ein Markierungswerkzeug zu haben, um zu skizzieren, wo die Stickerei platziert werden soll.
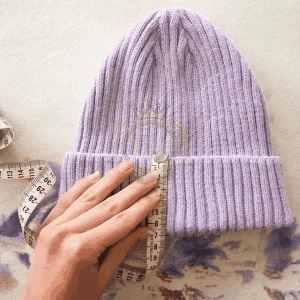
Vorbereiten der Beanie-Mütze zum Besticken
Bevor Sie mit dem Nähen beginnen, it’;Es ist wichtig, dass Sie Ihre Beanie-Mütze richtig vorbereiten. Dieser Schritt ist entscheidend, um sicherzustellen, dass Ihre Stickerei ordentlich und professionell aussieht.
Den Hut waschen und bügeln
Zuerst, Waschen Sie Ihre Beanie-Mütze und drücken Sie sie aus, um eine saubere und glatte Oberfläche zu erhalten. Dadurch werden Schmutz und Falten entfernt, die den Stickvorgang beeinträchtigen könnten.
Markieren der Stickplatzierung
Verwendung eines Markierungswerkzeugs, Umreißen Sie leicht den Bereich auf der Beanie-Mütze, an dem Sie das haben möchten Stickerei-Design plaziert sein.
Dies dient später als Orientierung beim Einspannen der Mütze in die Stickmaschine.
Einrichten der Stickmaschine und Auswählen des Designs
Now it’;Es ist Zeit, Ihre Stickmaschine einzurichten und sich auf den Stickzauber vorzubereiten!
Machen Sie sich mit den Bedienelementen der Stickmaschine vertraut
Bevor Sie in den Stickprozess eintauchen, Nehmen Sie sich einen Moment Zeit, um sich mit den Bedienelementen und Funktionen Ihrer Stickmaschine vertraut zu machen. Verstehen Sie, wie man die Maschine richtig einfädelt, Nadeln wechseln, Spannung einstellen, und navigieren Sie durch die verfügbaren Einstellungen.
Dieses Wissen erleichtert den Einrichtungsprozess und hilft Ihnen, unnötige Fehler zu vermeiden.
Laden des passenden Designs in die Stickmaschine
Wählen Sie ein Design, das zu Ihrem persönlichen Stil passt und die Beanie-Mütze ergänzt. Bei vielen Stickmaschinen können Sie Designs von Ihrem Computer hochladen oder eine Verbindung zu Stickmusterdatenbanken herstellen.

Choose a design compatible with your machine’;s format and transfer it to the machine’;s Speicher oder Arbeitsbereich.
Anpassen der Designgröße und Platzierung für Beanie-Mützen
Use the embroidery machine’;Mit der Software können Sie die Designgröße anpassen und es richtig auf der Beanie-Mütze positionieren. Stellen Sie sicher, dass das Design in den markierten Stickplatzbereich passt. Berücksichtigen Sie die Größe des Hutes und die gewünschte visuelle Wirkung des Designs.
Once you’;Bin mit den Anpassungen zufrieden, Bereiten Sie die Maschine zum Sticken vor, indem Sie sie einspannen Hut mit Stabilisator.
Einspannen der Beanie-Mütze zum Besticken
Wenn es um das Besticken von Beanie-Mützen geht, Der erste Schritt besteht darin, den Hut richtig einzuspannen.
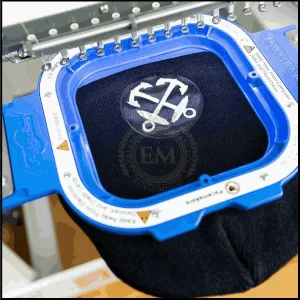
Dies sorgt für Stabilität während des Stickvorgangs und trägt zu einem sauberen und professionellen Finish bei.
Auswahl der richtigen Reifengröße für Beanie-Mützen
Nicht alle Stickrahmengrößen sind gleich, Und es ist wichtig, die richtige Mütze für Ihre Beanie-Mütze auszuwählen. Zu klein, und Sie riskieren, den Hut oder das Design zu verzerren; zu groß, und es kann sein, dass Sie beim Sticken Schwierigkeiten haben, eine gute Passform zu erzielen.
Suchen Sie nach einer Reifengröße, die zum Umfang Ihrer Beanie-Mütze passt und einen sicheren Halt bietet.
Die Beanie-Mütze richtig einspannen, um Stabilität mit der Beanie-Mütze zu gewährleisten
Jetzt haben Sie die richtige Rahmengröße, it’;Es ist Zeit, die Beanie-Mütze zu reifen. Drehen Sie zunächst die Mütze um, um sicherzustellen, dass die Stickerei außen liegt. Legen Sie den inneren Reifen in den Hut, Stellen Sie sicher, dass es eng am Stoff anliegt.
Dann, Legen Sie den äußeren Reifen über den Hut, Richten Sie es am inneren Rahmen aus. Drücken Sie den Hut vorsichtig nach unten, um ihn zwischen den Reifen zu befestigen, Stellen Sie sicher, dass es straff, aber nicht gedehnt ist.
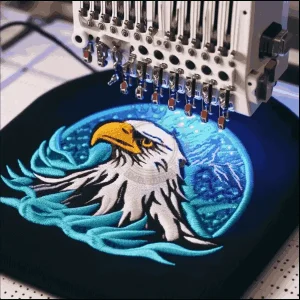
Sticken des Designs auf die Beanie-Mütze
sicher eingespannt, it’;Es ist Zeit, Ihr Design zum Leben zu erwecken.
Fädeln Sie die passende Farbe in die Stickmaschine ein
Bevor Sie mit dem Sticken beginnen, Stellen Sie sicher, dass Sie Ihre Stickmaschine mit der passenden Farbe einfädeln. Das mag wie eine Selbstverständlichkeit erscheinen, aber vertrau mir, we’;Wir alle hatten diese Momente
als wir versehentlich die falsche Farbe in die Maschine eingefädelt haben und es erst bemerkten, als das Design fertig war (Hoppla).
Ersparen Sie sich also den Kopfzerbrechen und überprüfen Sie die Garnfarbe noch einmal, bevor Sie beginnen.
Führen Sie einen Teststich durch, um die richtige Spannung und Platzierung sicherzustellen
Niemand mag Überraschungen, vor allem, wenn es ums Sticken geht. Um mögliche Katastrophen zu vermeiden, Machen Sie einen Probestich an einem Stoffrest oder an der Mütze selbst (if you don’;Ein kleines Prüfzeichen macht mir nichts aus) um sicherzustellen, dass Spannung und Platzierung korrekt sind.
Dies wird Ihnen helfen, etwaige Probleme zu erkennen, bevor sie Ihr Design ruinieren.
Sorgfältiges und präzises Sticken des Designs auf die Beanie-Mütze
Nun zum spaßigen Teil! Alles ist eingerichtet und validiert, it’;Es ist an der Zeit, Ihre Stickmaschine auf sich wirken zu lassen. Gehen Sie es langsam und gleichmäßig an, So kann die Maschine ihre Arbeit erledigen, während Sie die sanften und präzisen Bewegungen bewundern.
Achten Sie darauf, den Prozess zu überwachen, um sicherzustellen, dass alles reibungslos verläuft.
Feinschliff und Pflegehinweise für bestickte Beanie-Mützen
Sobald die Stickerei abgeschlossen ist, you’;fast fertig! Nur noch ein paar Schritte, um Ihrer Beanie-Mütze den letzten Schliff zu geben und dafür zu sorgen, dass sie immer gut aussieht.
Entfernen der Beanie-Mütze von der Stickmaschine und dem Stickrahmen
Nehmen Sie die Beanie-Mütze vorsichtig von der Stickmaschine und dem Stickrahmen. Lass dir Zeit, Denn zu schnelles Arbeiten kann dazu führen, dass sich die Fäden verfangen oder die Mütze unförmig wird.
Lösen Sie den Reifen vorsichtig und entfernen Sie ihn vom Hut, Achten Sie darauf, nicht zu stark zu ziehen oder zu ziehen.
Überschüssige Fäden abschneiden und die Stickarbeit prüfen
Now it’;Es ist an der Zeit, Ihrer bestickten Beanie-Mütze ein wenig Pflege zu gönnen. Nehmen Sie sich einen Moment Zeit, um Ihre Stickerei zu begutachten, Stellen Sie sicher, dass das Design klar und frei von losen Fäden ist. Wenn Sie verirrte Fäden entdecken, Schneiden Sie sie vorsichtig mit einer scharfen Schere ab, Achten Sie darauf, nicht in den Stoff einzuschneiden.
Ein wenig Liebe zum Detail kann hier einen großen Unterschied in der Abschlusspräsentation machen.
Hinweise zur richtigen Pflege
zuletzt, let’;Wir reden darüber, wie Sie Ihre bestickte Beanie-Mütze in Topform halten. Um die Integrität des Designs zu bewahren, it’;Am besten waschen Sie Ihre Mütze mit der Hand in kaltem Wasser und einem milden Reinigungsmittel.
Vermeiden Sie die Verwendung aggressiver Chemikalien oder Bleichmittel, da sie die Stickerei und den Stoff beschädigen können. Nach dem Waschen, Formen Sie den Hut neu und lassen Sie ihn vollständig an der Luft trocknen.
Und da haben Sie es! Indem Sie diese Schritt-für-Schritt-Anleitung befolgen, you’;Im Handumdrehen werden Sie Beanie-Mützen wie ein Profi besticken können. Schnappen Sie sich also Ihr Lieblingsdesign, Starten Sie Ihre Stickmaschine, und machen Sie sich bereit, Ihrer Wintergarderobe eine persönliche Note zu verleihen.
Viel Spaß beim Sticken!
EMdigitalisieren: Experte für die Digitalisierung von Stickereien zu Ihren Diensten
Wenn Sie an einem Stickprojekt jeglicher Art interessiert sind, Dann ist EMdigitizing die beste Option für Sie. Wir bieten Stickerei digitalisieren und Vektorkunstdienste mit einer schnellen Bearbeitungszeit. Sie können auch unsere Website besuchen und sich über unsere besten Dienstleistungen informieren.
Wir bieten auch ein tolles 50% Rabatt auf alle unsere Dienstleistungen für unsere angesehenen Erstkunden. Wir bieten auch an kostenlose Angebote in gerade erzeugt 5 Protokoll.
Schnappen Sie sich dieses zeitlich begrenzte Angebot und bringen Sie Ihr Stickprojekt mit EMdigitizing auf die nächste Stufe.
Wenn Sie Fragen zu diesem Thema haben, du kannst sie fragen. Vielen Dank, dass Sie sich die Zeit genommen haben, diesen Artikel zu lesen.
Viel Spaß beim Sticken!
Häufig gestellte Fragen:
Ja, Sie können eine Mütze besticken. Dabei werden Motive oder Muster auf den Stoff genäht, Normalerweise geschieht dies mit Nadel und Faden.
Einen Hut besticken, Normalerweise verwenden Sie einen Rahmen, um den Stoff straff zu halten, und nähen dann Ihr Design mit Stickgarn, nach einem Muster oder freihändig.
Unter Hutstickerei versteht man das Aufnähen dekorativer Motive auf Hüte, Oft werden bunte Fäden verwendet, um Muster oder Texte zu erstellen.
Das Besticken von Hüten kann aufgrund ihrer geschwungenen Form und des dicken Materials eine Herausforderung sein, aber mit Übung und den richtigen Werkzeugen, es wird beherrschbar.
Ja, Sie können Ihre eigene Kleidung besticken. It’;Es ist eine kreative Möglichkeit, Kleidung mithilfe grundlegender Nähkenntnisse und Stickmaterialien zu personalisieren.


