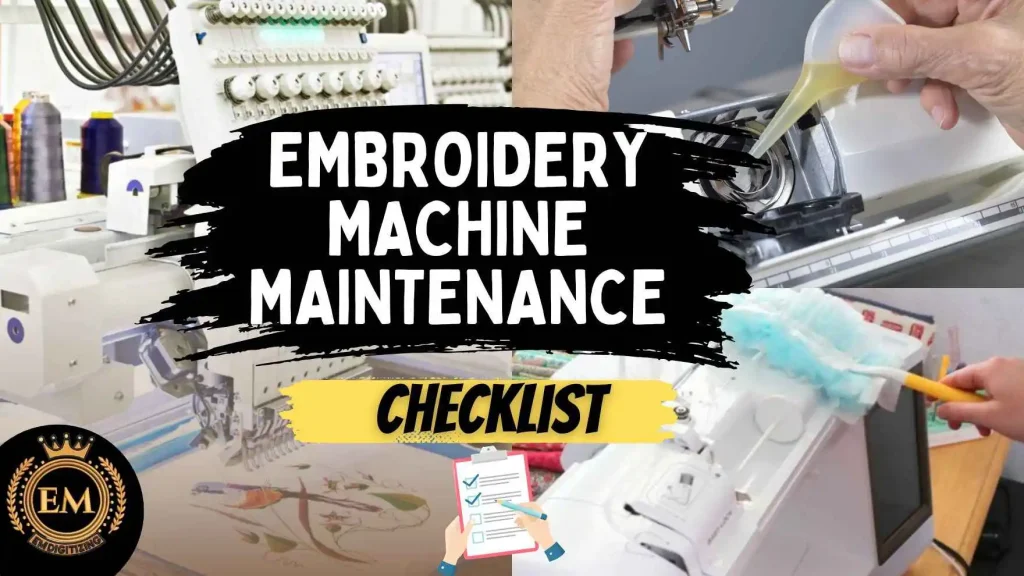
How to Do Embroidery Machine Maintenance Like a Pro?
Ever had your embroidery machine jam right in the middle of a big order? Frustrating, right?
Here’s the truth: most of the time, these issues don’t happen because something is “wrong” with the machine, they happen because the machine hasn’t been cared for properly.
If you’re someone who depends on your machine for beautiful, clean stitch-outs, then regular embroidery machine maintenance isn’t optional, it’s essential.
Let’s break this down in a simple, step-by-step guide. You’ll learn how to care for your machine daily, weekly, and monthly, without needing a technician.
How to Do Embroidery Machine Maintenance Like a Pro?
Why Does Maintenance Even Matter?
Think of your machine like your body. You eat well, exercise, and rest to stay healthy, right? Well, your embroidery machine needs its own version of that.
When you keep it clean, oiled, and checked regularly:
It stitches more smoothly
Your designs look cleaner and more accurate
You avoid those sudden breakdowns that mess up your projects
And your machine just lives longer, simple as that
And here’s a bonus: You save money on repairs and boost your output without working harder.
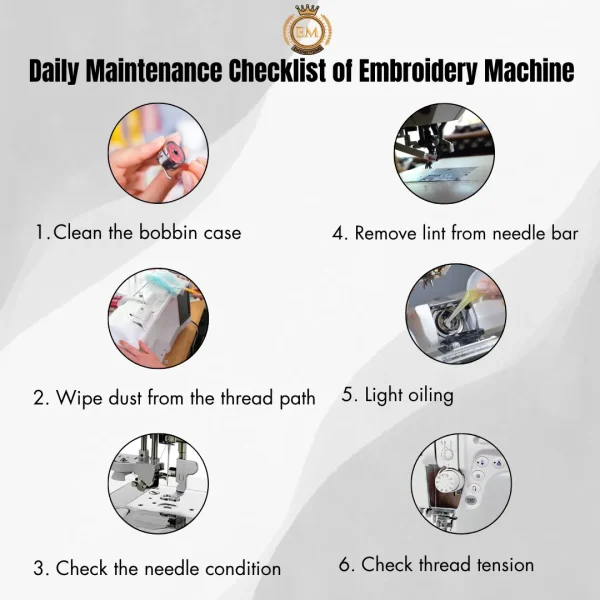
What You Should Do Daily to Keep Your Machine Running Smooth?
Daily Maintenance Checklist of Embroidery Machine
Taking care of your machine doesn’t mean spending hours every day. A few minutes of attention is more than enough to prevent common issues like loose tension, jammed threads, or broken needles.
Clean the Bobbin Case and Hook Area
Turn off your machine first. Then remove the bobbin case and use a small brush or cloth to clean out dust, lint, or thread fragments. This prevents stitching interruptions and keeps the thread path smooth.
Wipe the Thread Path
Start from the spool and move down to the needle, wiping the thread path clean with a dry cloth. This prevents buildup that could affect tension or cause your machine to skip stitches.
Embroidery Digitizing Services
If you are looking for embroidery digitizing services, EM digitizing is one of the best embroidery digitizing company. Providing all types of embroidery digitizing.
A bent or dull needle is harder to spot than you think. Look closely. If the tip is even slightly rough, replace it. A bad needle can damage fabric, break thread, and ruin designs.
Clean the Area Around the Needle Bar
Lint hides in the space above the needle. Carefully brush around the needle bar and presser foot area. This keeps the needle’s movement accurate and helps any sensor work properly.
Apply a Drop of Oil if Needed
Refer to your manual. If your model needs daily oiling, just one drop in the correct spot is enough. After oiling, turn on the machine for a few seconds to distribute it, then wipe off excess oil.
Check the Tension Before Stitching
Gently pull the thread and feel its resistance. If it feels wrong, too tight or loose, adjust it before you start. Uneven tension can mess up your entire design. These are the small but essential embroidery machine maintenance tips that protect your work.
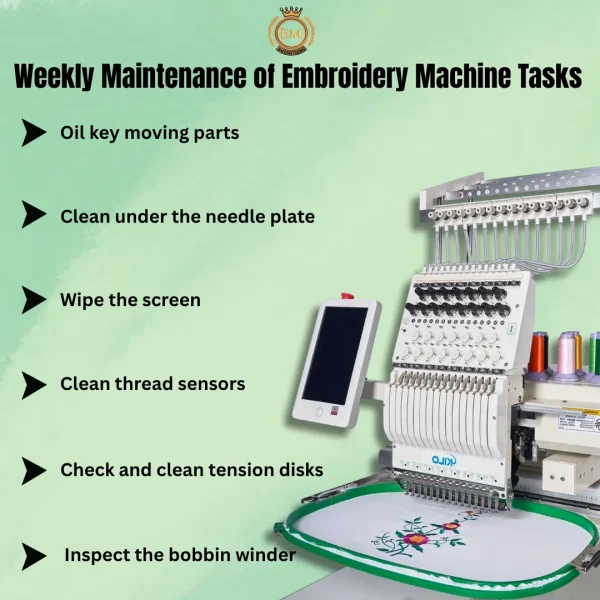
Weekly Tasks That Help Prevent Expensive Breakdowns
Weekly Maintenance of Embroidery Machine Tasks
Daily cleaning handles the basics. But once a week, it’s smart to go a little deeper. Think of this like giving your machine a fresh reset to keep everything running smoothly.
Oil the Main Moving Parts
If your machine manual suggests it, apply a small amount of oil to key points like the hook race or needle bar. Make sure to wipe away excess. This reduces friction and prevents wear on moving parts.
Clean Beneath the Needle Plate
Take off the needle plate with a screwdriver and gently clean underneath. You’ll usually find thread fuzz and lint packed under there. Cleaning it helps your fabric move evenly while stitching.
Wipe the Screen and Button Area
Use a clean, dry microfiber cloth to wipe your machine’s touchscreen and buttons. Avoid any liquids. This keeps the display clear and the controls working properly.
Wipe the Screen and Button Area
Use a clean, dry microfiber cloth to wipe your machine’s touchscreen and buttons. Avoid any liquids. This keeps the display clear and the controls working properly.
Clear Out the Thread Sensors and Cutters
If your machine has automatic sensors and cutters, they can get dusty over time. Use a soft brush to gently remove any buildup so they continue working as they should.
Clear Out the Thread Sensors and Cutters
If your machine has automatic sensors and cutters, they can get dusty over time. Use a soft brush to gently remove any buildup so they continue working as they should.
Embroidery Digitizing Services
If you are looking for embroidery digitizing services, EM digitizing is one of the best embroidery digitizing company. Providing all types of embroidery digitizing.
Slide a clean cloth or a small brush through the tension disks to clear any dust or lint. This ensures that the thread flows smoothly without causing uneven stitches or breaks. Keeping this area clean is an important part of your embroidery machine maintenance checklist.
Inspect the Bobbin Winder
Watch for loose threads or dust in the bobbin winder area. Clean it gently and make sure it spins freely. This keeps bobbins winding correctly and reduces the chance of tension issues.
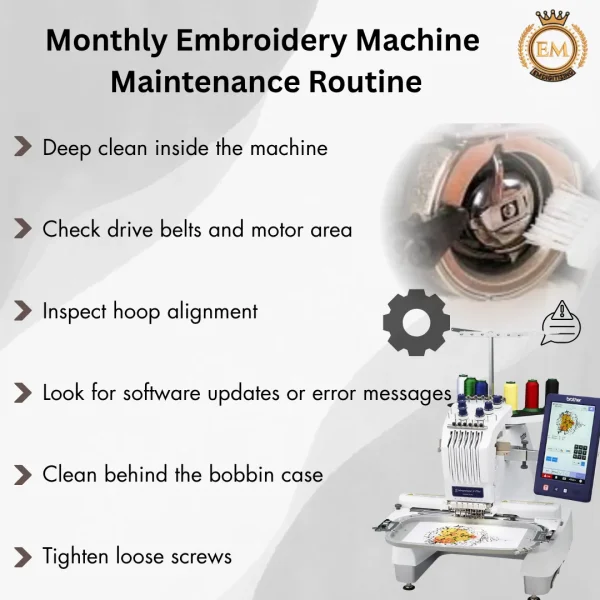
Monthly Maintenance That Makes Your Machine Last Longer
Monthly Embroidery Machine Maintenance Routine
A deeper clean once a month can save you from major breakdowns. This is where you go beyond surface cleaning and check the machine inside and out.
Open and Clean Inside the Machine
Power off and unplug your machine. If possible, remove covers to access the internal areas. Use a soft brush or vacuum designed for electronics to clean out hidden lint. Never use compressed air, it pushes dirt further in.
Inspect Motor Belts and Pulley Area
Check for dust, cracks, or looseness in the belts near the motor. Clean with a dry cloth. If anything looks off or your machine has been making strange sounds, it’s best to get professional help early.
Make Sure the Hoop Is Aligned Correctly
Attach a hoop and run a test movement. If the needle doesn’t land correctly, there might be a misalignment. Wipe the hoop arms and brackets, and tighten if needed just not too much.
Look for Software Updates and Error Logs
Many modern machines show updates or error messages in their settings. Check for updates that improve stitching performance and log any repeated errors so you can take action if needed.
Clean Behind the Bobbin Case
Remove the bobbin case and clean the space behind it. Lint often hides here and can affect your stitching if ignored. Use tweezers or a brush to gently pull debris outward.
Check and Tighten External Screws
With regular use, screws can loosen up. Lightly tighten any around the needle plate, screen panel, or body. A snug machine is a stable machine and stability helps your stitches stay accurate.
Habits That Help You Avoid Bigger Problems of Embroidery Machine
Even when you’re done with cleaning, your daily habits still matter. Using low-quality supplies or pushing your machine too hard can undo all your good work. That’s why investing in proper tools makes a real difference.
One thing that really helps is building your own embroidery machine tool kit. It doesn’t need to be fancy, just a set of screwdrivers, a lint brush, machine oil, and spare needles all kept in one place. Having the right machine embroidery tools nearby saves time and avoids mistakes.
The Smarter Way to Save on Repairs
Let’s face it: calling a technician isn’t cheap. You’ve probably already looked up embroidery machine maintenance cost, and the prices can be pretty high even for simple fixes. But by doing these tasks regularly, you avoid most of the problems that lead to service calls in the first place.
Still, if you ever need a full service or feel overwhelmed, a quick search like embroidery machine maintenance near me will help you find local support. But most of the time, with the tips above, you’ll be in full control.
One thing that really helps is building your own embroidery machine tool kit. It doesn’t need to be fancy, just a set of screwdrivers, a lint brush, machine oil, and spare needles all kept in one place. Having the right machine embroidery tools nearby saves time and avoids mistakes.
Conclusion
Taking care of your machine through regular embroidery machine maintenance is the smartest way to avoid problems and get beautiful stitch results every time. But even a well-maintained machine needs a high-quality design file to do its best work.
At EMDigitizing, we help you get the perfect start with professionally digitized files, made by hand, not auto software. We create clean, accurate designs that run smoothly on all types of embroidery machines and fabrics. Whether you’re working on a small personal project or running a busy embroidery shop, we’re here to support you with fast service, top quality, and 24/7 customer help.
And if you’re trying our service for the first time, we’re offering 50% off your first order, so you can check the quality risk-free.
Take care of your machine, and trust EM Digitizing for the designs. Order now and experience the difference.
Yes, many embroidery machines need oiling to run smoothly. Always check your machine’s manual to know when and where to add oil. Use only proper sewing machine oil and avoid over-oiling.
If you use your machine regularly, it’s good to have it serviced once or twice a year by a technician. Regular home cleaning helps reduce the need for professional repairs.
Embroidery machines can last more than 10 years if you take good care of them. Regular cleaning, using the right materials, and proper storage can help your machine stay in great shape.
It’s best to change the needle after every 8 to 10 hours of stitching. A damaged or dull needle can break thread, harm fabric, or cause poor stitch quality.
Basic maintenance includes cleaning lint, checking the needle, wiping the thread path, and oiling if needed. Doing this regularly keeps your machine working properly and avoids stitching problems.
It’s not hard at all if you stay consistent. With a small routine, daily, weekly, and monthly. You can keep your machine clean and working without needing expert help.
Request A Quote
Get embroidery digitizing cost estimation for free within few minutes.

 Your cart is empty

