

Why Create &; Sticken Sie einen Kissenbezug?
Whether you’;Wechseln Sie Ihr Kissenmuster für ein modernes Wohnzimmer Strandgefühl auf, or something cute for a little girl’;S Bettwurfkissen, Die Änderung ist einfach. Das Ändern des Looks kann so einfach sein wie das Ändern des von Ihnen verwendeten Stoffes und Designs. Es ist einfacher, zu bestimmen, welcher Stabilisator für jeden Stoff verwendet werden soll, als Sie denken, Schauen Sie sich einfach unseren vollständigen Leitfaden zu Stickstabilisatoren.
Wenn Sie einen neuen Kissenbezug machen, Sie können das Originalkissen ersetzen, Erlauben Sie Ihnen, den Ton Ihres Zimmers so oft wie Sie möchten, während Sie mit kleinem Budget möchten.
Not only will you get to do something you know you’;Ich liebe und einzigartig sein, but you’;Ich spart auch Geld dabei!
Für das Sticken eines Kissenbezugsprojekts erforderlich
- Eine Reihe von 100% Baumwollkissen. Dehnbarer, Weniger robuste Stoffe lassen Ihre Stiche schlampig und chaotisch aussehen.
- Stickseide in mindestens zwei Farben. Ich habe meine hier gefunden, Aber die meisten lokalen Handwerks-/Nähgeschäfte sollten eine gute Auswahl haben.
- Ein Bleistift.
- Ein Eisen.
- Ein Stickgerte, so was. Holz oder Plastik ist in Ordnung.
- Sticknadeln, So diese. Die Augen dieser Nadeln sind größer als normale Nähnadeln, um dicke Stickseide leicht zu fädeln.
- Seam Reaper, so.
Tutorial zum Sticken eines Kissenbezugs
Schritt 1:
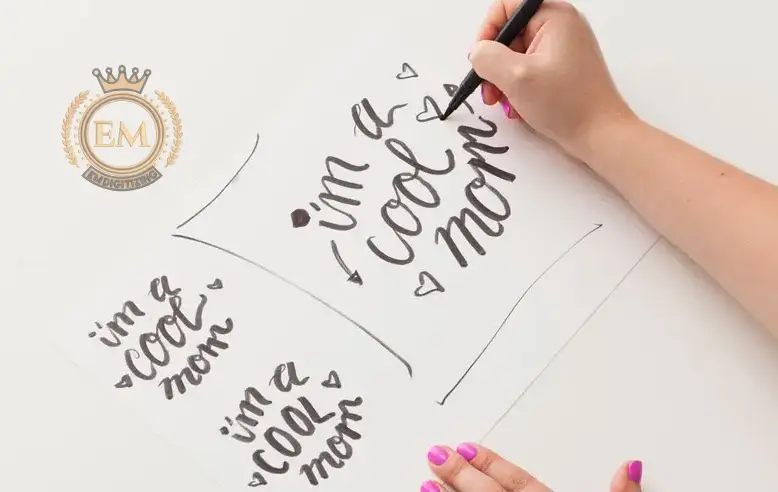
Skizzieren Sie Ideen für Ihre Entwurf Auf Papier, damit Sie wissen, dass es auf Ihrem Stoff gut aussieht. If you’;Sie sind nicht sicher, dass Ihre Freehhand -Zeichnungsfähigkeiten, Es gibt viel Bügeleisen Stickmotive und Alphabete zur Verfügung, die Ihnen helfen.
Schritt 2:
If you’;Verwenden Sie kein Bügellstein-Design, Bügeln Sie Ihr Kissen im Voraus. Es können schwierig zu nähen sein. Once I decided on my final design—the words Sweet Dreams in cursive with a few ’;50S-Style Starbursts, die um sie herum verstreut sind-ich zog sie auf dem Kissen in sehr leicht, Sie werden nicht sichtbar sein.
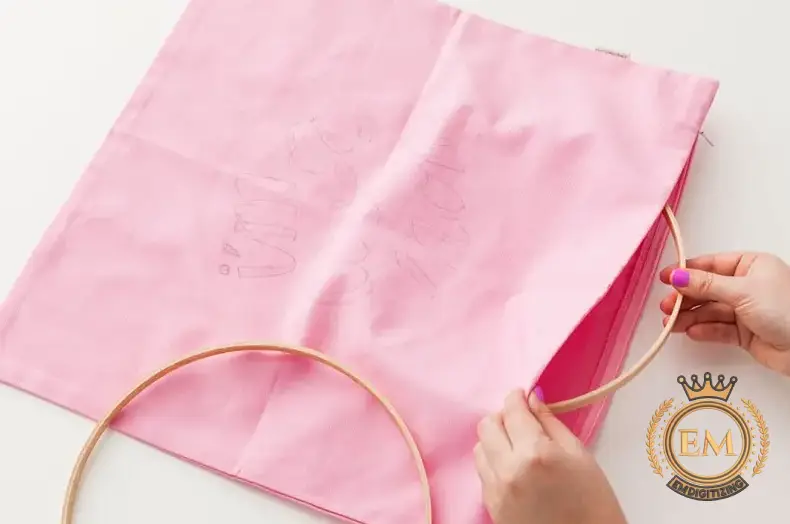
Schritt 3:
Passen Sie die Seite des Kissens ein, auf dem Sie Ihr Design gezeichnet haben (not both sides—you don’;Ich möchte es nicht nähen!) in den Stickel, das zieht den Stoff fest wie eine Trommel, um Ihnen ein ordentliches zu geben, Sauberer Blick. Kann genäht werden. möglich. Das Design kann zunächst nicht passen, but that’;S Ok.
Schritt 4:
Wählen Sie Ihre erste Zahnseidefarbe und Faden es durch das Auge der Nadel. Bevor Sie mit dem Nähen beginnen, pull a decent length of floss from the spool—it’;s immer besser, mehr zu haben als Sie brauchen, anstatt die Hälfte durch und renne aus - und binde die Enden in einen engen Knoten zusammen.
Schritt 5:
 Für dieses Projekt, we’;Verwenden Sie einen geteilten Stich, Das ist am einfachsten zu meistern und schafft eine schöne, sogar Linie. Wie Sie sehen werden, Stickseide besteht aus sechs Strängen. Wenn Sie Ihre Nadel fädeln, Diese sechs Stiche gehen durch das Auge. Wenn Sie Ihr Garn nach oben ziehen, Diese sechs Stränge kommen auch auf. Aber für einen geteilten Stich, trennen Sie diese Stiche, indem Sie nach dem Erstellen jeden durch die einzelnen durchlaufen.
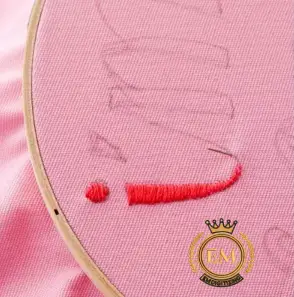
Schritt 6:
Now it’;Es ist Zeit, Ihren ersten Stich zu machen! In diesem Tutorial, we’;re going to refer to the side of the pillow where the design appears as the “;front”; and the side where we’;ll tie our knots as the “;back.”; (Mir ist klar, dass dies eine sehr technische und wissenschaftliche Sprache ist, Aber ich vertraue deiner Intelligenz). Beginnend an einem Ende Ihres Designs (Für mich war es der erste s), Ziehen Sie die Nadel zurück und bringen Sie die Zahnseide nach vorne. Setzen Sie diesen Stich fort, Das Nähen durch jeden vorherigen Stich, während Sie sich entlang Ihrer Linie bewegen, Splitterstichstil.
Schritt 7:
As long as you’;Gehen Sie mit einer kontinuierlichen Linie in der gleichen Farbe, Fahren Sie weiter, bis die Linie endet. Since the S in my first word wasn’;t mit nass verbunden, Ich band die Zahnseide in den Rücken, als ich mit dem ersten Brief fertig war, und begann mit dem Rest des Wortes von vorne. It’;S einfach: once you’;Ich hängte Ihre Zahnseide auf die Rückseite des Stoffes, Teilen Sie Ihre Zahnseide Fäden in zwei Stränge und binden sie in einen engen Knoten wie für einen Schnürsenkel. Sie tun es, Aber ohne Bogen. , so oft Sie können.
Place the knots as close to the fabric as possible to ensure your design doesn’;T entwirrt. Sie können viele Farben Ihrer Wahl verwenden. Denken Sie daran, alle Linien mit Rückenknoten zu beginnen und zu beenden, um Ihre harte Arbeit zu speichern. Wenn die Rückseite Ihres Stoffes wie ein totales Chaos von Knoten aussieht, that’;S okay! Dies ist die Front, die Sie schön aussehen möchten.
It’;S auch vollkommen normal, um einen Stich zu machen (oder 10) Das wird versehentlich ein wenig unordentlich. Wenn dein Entwurf isn’;Ich schaue so, wie du geplant hast, Schnapp dir deinen Nahtripper und schieben Sie sie durch die falsche Stichschleife auf der Rückseite Ihres Materials, Dann ziehen Sie den Zahnseide vorsichtig heraus. Jetzt können Sie diesen Teil ausprobieren (nachdem Sie sich still verflucht haben) ohne Schaden. Es kann enttäuschend sein, aber es passiert allen!
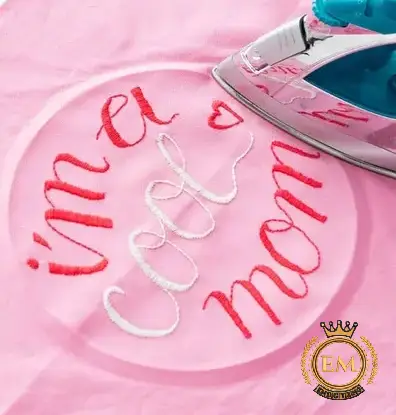
Fazit
Once you’;wieder fertig, Legen Sie diesen Trottel auf Ihr Bett und nehmen Sie eine wohlverdiente Schönheitsruhe! Wenn es Zeit ist, sie zu waschen, your pillows should be able to withstand machine washing in hot water on the gentle cycle as long as you’;wieder verwenden 100% Baumwollstoff und binden Sie Ihre Knoten schön und eng. - Vergewissern Sie sich, dass Sie Bleach nicht verwenden. Und waschen Sie sie mit ähnlichen Farben, um die besten Ergebnisse zu erzielen.
I’;Ich bin mir ziemlich sicher, dass dies die billigste Winteraktivität am Tag ist, die es je gab, Daher ermutige ich Sie dringend, die Erkältung zu vervollständigen, Trostlose Tage auf Stickpartys! Eine Warnung, obwohl: Sobald Sie anfangen, Möglicherweise nähen Sie alles in Ihrer Garderobe/Garderobe. Für Ihre eigene Sicherheit, maybe think twice before you decide to “;customize”; your mom’;s frisch neu gepolsterte Couch. Andernfalls, viel Spaß, und glückliches Nähen!


