Stickende Kopfbedeckungsprodukte können einfache Hüte und Kappen in atemberaubende Verwandte verwandeln, personalisierte Artikel. Whether you’;Re Ein Anfänger, der grundlegende Kopfbedeckungsticketechniken oder ein erfahrener Sticker erforschen möchte, der darauf abzielt, fortschrittliche Methoden zu beherrschen.
Dieser Leitfaden führt Sie durch die wesentlichen Fähigkeiten, die für die Erstellung von Designs in verschiedenen Kopfbedeckungen erforderlich sind.
Sticktechniken für Kopfbedeckungsprodukte: Von den Grundlagen bis zum Fortgeschrittenen
Auswählen der idealen Kopfbedeckung für Stickereien
Der erste Schritt in der Stickerei ist die Auswahl der richtigen Kopfbedeckung. Jeder Typ hat seine einzigartigen Eigenschaften, die Ihre Stickergebnisse verbessern können:
- Mützen: Aus Strickstoff gemacht, Mützen sind weich und flexibel, Sie ideal für Designs, die Stretchability erfordern. Sie arbeiten am besten mit mutig, simplistic designs that highlight the fabric’;S Textur.
- Snapbacks: Bekannt für ihre starre vorne und verstellbare Schnappscheibe auf der Rückseite, Schnappbacks bieten eine Wohnung, stabile Oberfläche für aufwendige Designs und erfreuen sich großer Beliebtheit in der urbanen Mode.
- Baseballmützen: Diese Mützen sind eine klassische Wahl zum Besticken, Mit einer glatten Vorderseite, die sich perfekt für detaillierte Logos und Designs eignet, die eine präzise Stichplatzierung erfordern.
- Eimerhüte: Mit ihrer umlaufenden Krempe, Fischerhüte bieten mehr Oberfläche, um kreative Designs sowohl auf der Krone als auch auf der Krempe zur Geltung zu bringen, Dadurch sind sie vielseitig einsetzbar für lässige und stilvolle Looks.
- Trucker-Mützen: Charakteristisch sind die Netzrückseite und die solide Frontplatte, Trucker-Mützen eignen sich hervorragend für Mutige, lebendige Designs, die auffallen.
- Visiere: Visiere sind aufgrund ihrer offenen Oberseite und des breiten Frontbereichs am einfachsten zu besticken, Ideal für Logos oder Werbebotschaften.
Grundlegende Sticktechniken für Kopfbedeckungen
Um anzufangen, Sie sollten diese grundlegenden Techniken verstehen:
- Flache Stickerei
- Schriftzug auf Kopfbedeckungen
- Technische Wandleuchte
1. Flache Stickerei
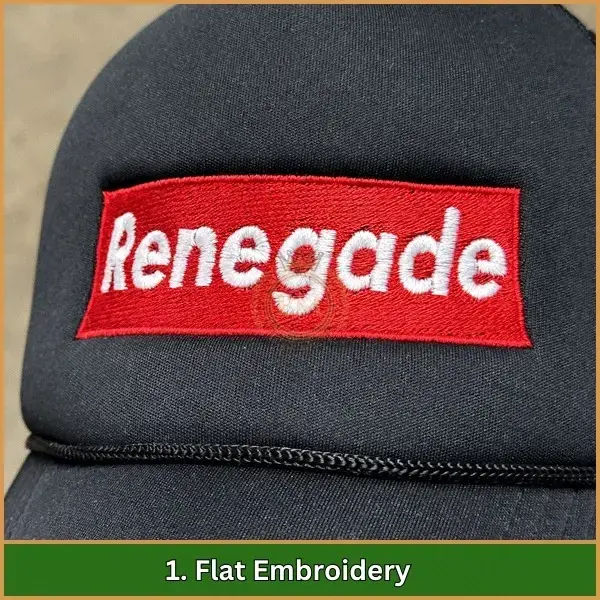
Flachstickerei ist eine Methode, bei der Motive direkt auf den Hutstoff gestickt werden, Dadurch entsteht eine flache und glatte gestickte Oberfläche.
Es wird häufig für Logos verwendet, Text, und grundlegende grafische Designs für Kopfbedeckungsprodukte.
Vorteile:
- Vielseitig: Geeignet für eine Vielzahl von Designs, von einfachen Logos bis hin zu detaillierten Grafiken.
- Professionelles Finish: Produziert sauber, Polierte Designs, die professionell und raffiniert aussehen.
- Haltbarkeit: Flache Stickereien halten im Laufe der Zeit gut, insbesondere bei häufig getragenen Kopfbedeckungen wie Mützen.
Hauptmerkmale:
- Sticharten: Zu den gängigen Sticharten bei der Flachstickerei gehören Satinstiche für glatte Ränder, Füllstiche zum Abdecken größerer Flächen, und Laufstiche für detaillierte Linien oder Umrisse.
- Designflexibilität: Es eignet sich sowohl für einfache als auch für komplexe Designs, Allerdings sollten Entwürfe ordnungsgemäß digitalisiert werden, um die besten Ergebnisse zu erzielen.
- Stoffkompatibilität: Flache Stickereien können auf einer Vielzahl von Stoffen durchgeführt werden, einschließlich Baumwolle, Polyester, und Mischungen. Es ist wichtig, den Nadel- und Fadentyp auf den Stoff abzustimmen, um eine Beschädigung des Stoffes zu vermeiden.
- Präzision: Beim Flachsticken ist eine genaue Digitalisierung des Motivs erforderlich, um sicherzustellen, dass die Stiche sauber und richtig platziert sind.
2. Schriftzug auf Kopfbedeckungen
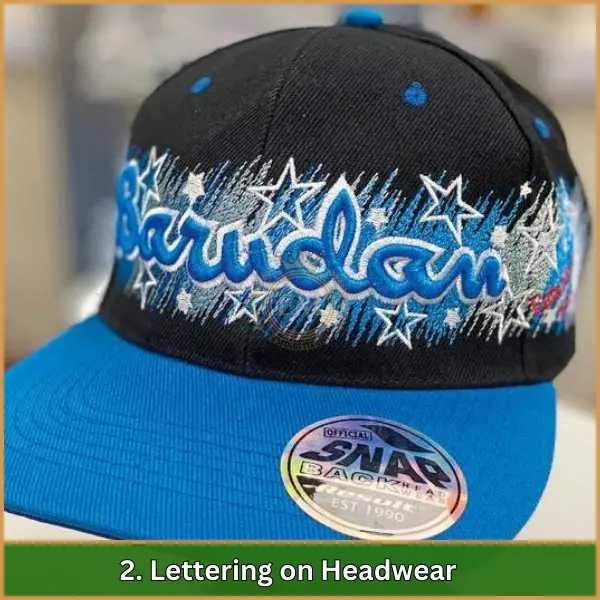
Beim Lettering wird Text auf Hüte gestickt, Dies macht es zu einer der beliebtesten Techniken zur Personalisierung von Kopfbedeckungen.
Ob es darum geht, einen Namen hinzuzufügen, ein Markenslogan, oder ein Logo, Schriftzüge verleihen Mützen und Hüten eine persönliche und professionelle Note.
Vorteile:
- Personalisierung: Perfekt für Sonderanfertigungen wie Monogramme, Branding, oder Werbeartikel.
- Vielseitigkeit: Funktioniert gut für verschiedene Huttypen, von Baseballkappen bis hin zu Mützen.
- Branding-Möglichkeiten: Schriftzüge auf Kopfbedeckungen sind eine tolle Möglichkeit, Firmennamen oder Teamlogos hervorzuheben.
Hauptmerkmale:
- Schriftartenauswahl: Wählen Sie „klar“., lesbare Schriftarten, die zur Größe der Kopfbedeckung passen. Sans-Serif-Schriftarten eignen sich oft ideal für kleine oder dichte Texte.
- Stichtyp: Satinstiche werden am häufigsten für Schriftzüge verwendet, da sie eine glatte Oberfläche erzeugen, polierter Look. Sie sorgen auch für Klarheit, insbesondere bei der Verwendung von fetten Schriftarten.
- Skalierung: Korrekt skalierte Buchstaben stellen sicher, dass sie nicht zu klein oder verzerrt sind, insbesondere auf gekrümmten Oberflächen wie Kappen.
3. Technische Wandleuchte
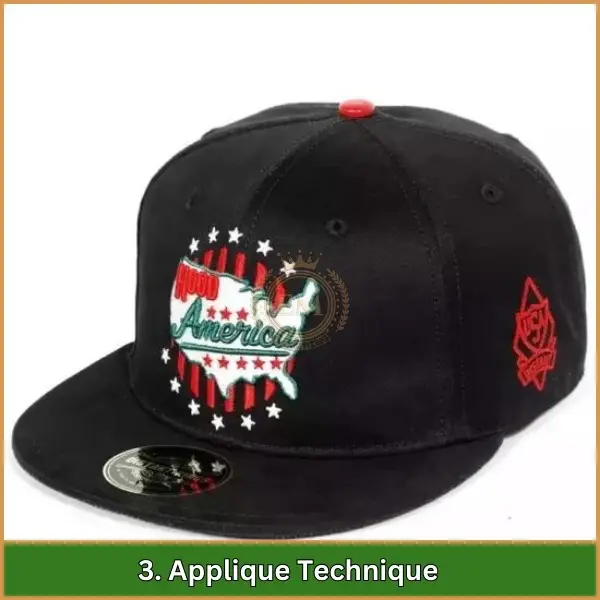
Beim Applizieren wird ein Stück Stoff auf den Grundstoff der Mütze genäht.
Das verleiht Tiefe, Textur, und Kontrast zum Design, was es zu einem Favoriten für größere macht, mutigere Muster.
Vorteile:
- Erkennbare Wirkung: Erzeugt ein dynamischeres und optisch interessanteres Design durch die Schichtung verschiedener Stoffe.
- Textur und Kontrast: Das Hinzufügen von Stoffschichten kann für Kontrast in Textur und Farbe sorgen, Designs hervorstechen lassen.
- Zeiteffizienz: Im Vergleich zu vollständig gestickten Designs können Applikationen größere Flächen mit weniger Nähten abdecken, Zeit sparen.
Hauptmerkmale:
- Stoffauswahl: Wählen Sie Stoffe wie Filz, Baumwolle, oder Satin, die einen Kontrast zum Hutmaterial bieten. Der Stoff sollte leicht zu schneiden und zu handhaben sein.
- Nähen: Die Kanten der Applikation werden üblicherweise mit einem Zickzack- oder Satinstich versäubert, Stellen Sie sicher, dass der Stoff sicher befestigt ist und das Design sauber ist, scharfe Kanten.
- Haltbarkeit: Die Applikation fügt eine zusätzliche Stoffschicht hinzu, Verleiht dem gestickten Bereich Haltbarkeit und sorgt gleichzeitig für kräftige Akzente, farbenfrohe Designs.
Fortgeschrittene Techniken für verbesserte Details bei Kopfbedeckungen
Once you’;Sie sind mit den Grundkenntnissen vertraut, Diese fortgeschrittenen Techniken können Ihren Projekten Flair verleihen:
- Freistehende Spitze
- Monogrammierungstechniken
- 3D Puffstickerei
1. Freistehende Spitze
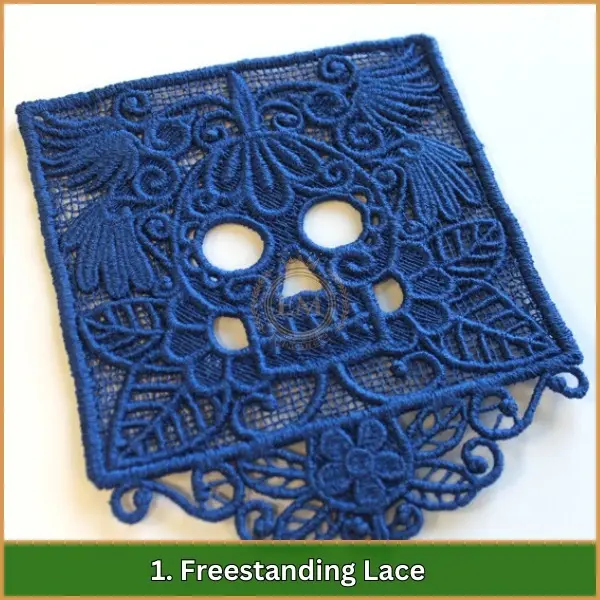
Freistehende Spitze ist eine heikle Angelegenheit Sticktechnik Dabei werden Spitzenmuster auf ein wasserlösliches Vlies genäht. Sobald das Nähen abgeschlossen ist, Der Stabilisator wird weggespült, Hinterlässt ein wunderschön gesticktes Lochmuster.
Vorteile:
- Elegantes Design: Ideal zum Hinzufügen komplizierter, dekorative Elemente bis hin zu Kopfbedeckungsprodukten, especially for women’;s Hüte oder Brautaccessoires.
- Vielseitig einsetzbar: Kann an verschiedenen Stellen des Hutes angebracht werden, wie die Krempe oder die Krone, verleiht dem Gesamtdesign eine einzigartige Note.
- Keine Stoffbasis erforderlich: Erstellt eine eigenständige Spitzenstruktur, die nicht auf einen anderen Stoff genäht werden muss.
Hauptmerkmale:
- Wasserlöslicher Stabilisator: Der Stabilisator löst sich in Wasser, damit die Spitze von alleine stehen kann.
- Komplexe Muster: Freistehende Spitze passt gut zu komplizierten, Blumen-, oder dekorative Designs, Perfekt, um Kopfbedeckungen eine elegante Note zu verleihen.
- Anwendung: Spitze kann als Akzent oder Verzierung verwendet werden, Dies macht es zu einer vielseitigen Wahl zur Verbesserung des Designs.
2. Monogrammierungstechniken
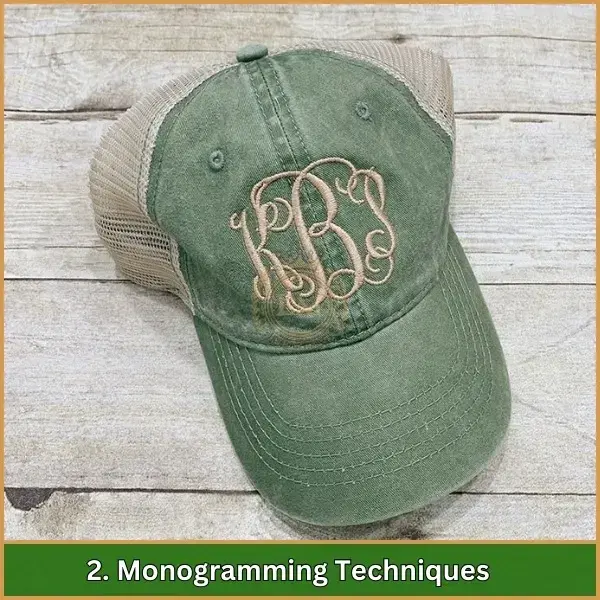
Beim Monogrammieren werden Initialen oder vollständige Namen auf Hüte gestickt, verleiht Kopfbedeckungen eine persönliche Note. Von eleganten Schriften bis hin zu modernen Blockbuchstaben, Monogramme verleihen jedem Design ein stilvolles und individuelles Element.
Vorteile:
- Personalisierung: Ideal für Sonderanfertigungen, verleiht dem Hut ein Unikat, persönliches Gefühl.
- Vielzahl von Stilen: Monogrammieren bietet eine Reihe von Schriftarten, von klassisch und formell bis modern und lässig, So können Sie das Design an die Vorlieben des Kunden anpassen.
- Vielseitig einsetzbar: Funktioniert gut für alle Arten von Kopfbedeckungen, einschließlich Kappen, Mützen, und Visiere.
Hauptmerkmale:
- Schriftartenvielfalt: Sie können aus einer großen Auswahl an Schriftarten wählen, Abhängig von dem Stil, den Sie erreichen möchten.
- Größe und Platzierung: Die richtige Größe und Positionierung der Initialen ist wichtig, um sicherzustellen, dass sie auf dem Hut proportional und stilvoll aussehen.
- Anpassung: Das Monogrammieren ermöglicht personalisierte Geschenke oder Markenwerbung, Daher ist es bei Firmen- und Einzelbestellungen sehr beliebt.
3. 3D Puffstickerei
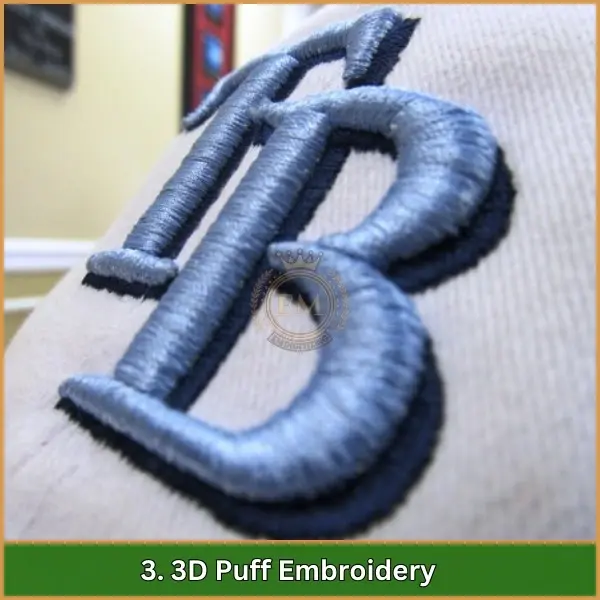
3Beim D-Puff-Sticken wird vor dem Sticken Schaumstoff unter den Nähbereich gelegt.
Dieser Schaum hebt die Nähte von der Oberfläche ab, Erstellen eines Fettdrucks, dreidimensionaler Effekt.
Vorteile:
- Beeindruckende visuelle Wirkung: Das erhabene Design verleiht einen mutigen Eindruck, aufmerksamkeitsstarke Wirkung, Daher ist es ein Favorit für Sportkappen und Werbeartikel.
- Haltbarkeit: Der Schaumstoff bietet zusätzlichen Halt für die Nähte, Dadurch wird das gestickte Design haltbarer und verschleißfester.
- Textur: Fügt dem Design ein taktiles Element hinzu, Dadurch ist es nicht nur optisch ansprechend, sondern auch haptisch interessant.
Hauptmerkmale:
- Schaumstoffbasis: Der Schaumstoff wird vor dem Nähen unter das Design gelegt, Erzeugen eines dreidimensionalen Aussehens.
- Stichdichte: Die Stichdichte muss angepasst werden, um sicherzustellen, dass der Schaum vollständig bedeckt ist und das Design glatt und gleichmäßig erscheint.
- Designeignung: 3D-Puff-Stickerei funktioniert am besten mit einfach, mutige Designs, wie Logos oder große Texte, da komplizierte Details im erhabenen Effekt verloren gehen können.
Fortgeschrittene Stickfähigkeiten für das Sticken von Kopfbedeckungen
Für diejenigen, die die Grenzen ihrer Stickfähigkeiten erweitern möchten, Diese fortgeschrittenen Techniken sind eine Erkundung wert:
- Kreuzstich auf Maschinen
- Fotostich-Stickerei
- In-the-Hoop-Stickerei
1. Kreuzstich auf Maschinen
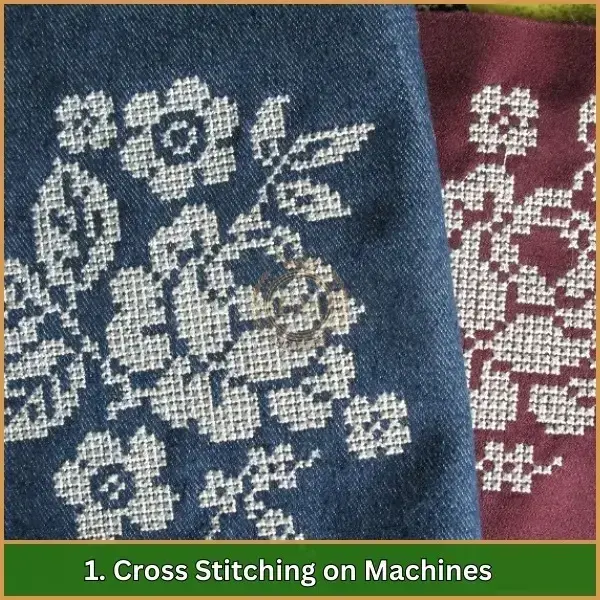
Kreuzstich, traditionell a Handstickerei Verfahren, kann für Maschinen angepasst werden, um einzigartige Designs zu erstellen, strukturiertes Aussehen. It involves making “;X”;-geformte Stiche, verleiht einen traditionellen und dennoch stilvollen Look.
Vorteile:
- Strukturiertes Aussehen: The “;X”; Stiche verleihen dem Design eine besondere Note, handgenähte Textur, Ideal zum Hinzufügen von Tiefe und Komplexität.
- Traditioneller Look: Das bringt einen Klassiker, Vintage-Gefühl im Design, Dadurch hebt es sich von anderen Stickstilen ab.
- Vielseitigkeit: Geeignet sowohl für einfache als auch komplizierte Muster, was eine große Bandbreite an Gestaltungsmöglichkeiten ermöglicht.
Hauptmerkmale:
- Kreuzstichmuster: Die Maschine ahmt das Kreuzstichverfahren von Hand nach, einen handwerklichen Look schaffen.
- Farbspiel: Mehrere Garnfarben kann verwendet werden, um lebendige Bilder zu erstellen, komplizierte Muster.
- Designvielfalt: Von einfachen geometrischen Formen bis hin zu komplexen, detaillierte Designs, Kreuzstich bietet große Vielseitigkeit.
2. Fotostich-Stickerei
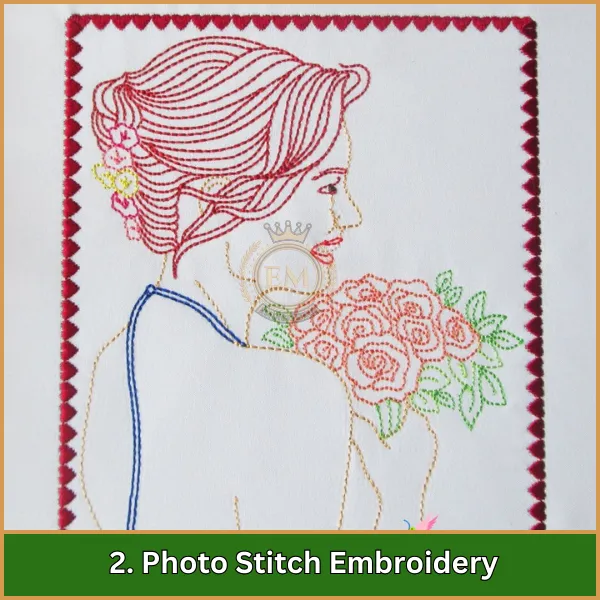
Beim Fotostich-Sticken werden hochauflösende Bilder in detaillierte Stichmuster umgewandelt. Mit dieser Technik können Sie realistische Porträts oder detaillierte Bilder auf Hüte sticken, einen fotorealistischen Effekt erzeugen.
Vorteile:
- Hohe Detailgenauigkeit: Erfasst komplizierte Details und Farbverläufe, Damit eignet es sich perfekt für die Nachbildung von Fotos, Logos, oder realistische Designs.
- Individuelle Designs: Ideal zum Personalisieren von Kopfbedeckungen mit Fotos, detaillierte Logos, oder individuelle Kunstwerke.
- Professioneller Look: Der Fotostich sorgt für ein künstlerisches und professionelles Finish, insbesondere für Sonderanfertigungen.
Hauptmerkmale:
- Bildkonvertierung: Hochauflösende Bilder werden in digitalisierte Stichdateien umgewandelt, die dann auf den Stoff gestickt werden.
- Komplexität des Nähens: Die Technik erfordert ein hohes Maß an Präzision und Maschinenkontrolle, da das Design oft aus Tausenden kleiner Stiche besteht.
- Testläufe: Um sicherzustellen, dass sich das Design gut auf die Mütze übertragen lässt und die Farben korrekt erscheinen, wird empfohlen, es mit einem ähnlichen Stoff zu testen.
3. In-the-Hoop-Stickerei
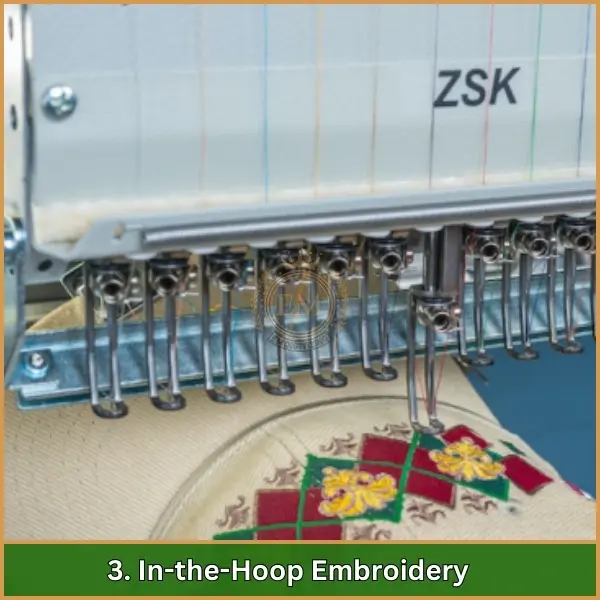
Im-Stickrahmen ist eine Technik, bei der ganze Projekte innerhalb des Stickrahmens fertiggestellt werden, Kombinieren mehrerer Schritte wie Nähen, Schneiden, und sogar funktionale Elemente wie Reißverschlüsse hinzufügen.
Vorteile:
- Präzision: Hält den Stoff stabil im Stickrahmen, Dadurch wird sichergestellt, dass die Designs präzise und konsistent gestickt werden.
- Multifunktional: Ermöglicht die Erstellung komplexer Projekte, die über einfache Stickereien hinausgehen, wie zum Beispiel das Hinzufügen von Taschen, Reißverschlüsse, goldene Applikationen.
- Effizienz: Kombiniert mehrere Schritte in einem Projekt, Dadurch entfällt die Notwendigkeit zusätzlicher Feinarbeiten nach Abschluss der Stickerei.
Hauptmerkmale:
- Kontrolliertes Nähen: Der Stoff bleibt im Stickrahmen stabil, Dies ermöglicht präzises Nähen und verringert das Fehlerrisiko.
- Projektvielseitigkeit: In-the-Hoop-Projekte können funktionale oder dekorative Elemente beinhalten, Dadurch eignet es sich für die Erstellung von mehr als nur gestickten Designs.
- Detaillierte Planung: Dies erfordert eine sorgfältige Planung und Digitalisierung der Stickerei, da das gesamte Projekt innerhalb der Grenzen des abgeschlossen werden muss Stickrahmen.
Professionelle Tipps für außergewöhnliche Ergebnisse
Sorgen Sie mit diesen Expertentipps dafür, dass Ihre Stickerei hervorsticht.
- Auswahl der richtigen Materialien: Investieren Sie in hochwertige Fäden und Stabilisatoren, die zum Stofftyp Ihrer Kopfbedeckung passen.
- Digitalisierung und Designtests: Digitalisieren Sie Ihre Designs präzise und führen Sie Tests mit ähnlichen Stoffen durch, um Probleme beim endgültigen Sticken zu vermeiden.
- Gerätewartung: Pflegen Sie regelmäßig Ihre Stickmaschine um eine gleichbleibende Qualität sicherzustellen und mechanische Ausfälle zu verhindern.
Endeffekt
Das Besticken von Kopfbedeckungen ist eine großartige Möglichkeit, einzigartige und personalisierte Designs zu erstellen. Egal, ob Sie gerade erst anfangen oder mit fortgeschrittenen Techniken arbeiten, Mit den richtigen Fähigkeiten können Sie professionell aussehende Kopfbedeckungen herstellen.
Von der einfachen bis zur fortgeschrittenen Stickerei, Übung wird Ihnen helfen, Ihre Projekte zu verbessern und hervorzuheben.
Wenn Sie Zeit sparen und perfekt digitalisierte Designs für Ihre Stickerei erhalten möchten, EMdigitalisieren ist hier, um zu helfen. Unser Expertenteam kann Ihre Ideen in gebrauchsfertige Stickdesigns umsetzen.
Plus, Wir bieten ein 50% Rabatt für alle Erstkunden! Überlassen Sie EMdigitizing die technische Arbeit, damit Sie sich auf Ihre Kreativität konzentrieren können.
Probieren Sie EMdigitizing noch heute aus und sehen Sie, wie wir es zu Ihrem machen können Stickprojekte einfacher und besser!
Häufig gestellte Fragen
Ja, Sowohl Hüte als auch Mützen fallen unter die Kategorie Kopfbedeckungen und Kopfbedeckungszubehör. Der wesentliche Unterschied besteht darin, dass Hüte immer eine Krempe und eine geformte Krone haben, während Kappen weniger strukturiert sind, es fehlt eine Krempe, aber immer mit Schirm oder Visier versehen.
Kopfbedeckung, Kopfbedeckung, oder Kopfschmuck bezieht sich auf jedes Kleidungsstück, das auf dem Kopf getragen wird, einschließlich Hüte, Helme, Turbane, und andere Arten. Diese Gegenstände können zum Schutz getragen werden, Dekoration, religiöse oder kulturelle Gründe, oder um gesellschaftlichen Bräuchen zu folgen.
- Waschen Sie immer Ihre Hände, bevor Sie mit einem Stickprojekt beginnen.
- Stellen Sie sicher, dass die Kanten der Leinwand gesichert sind, um ein Ausfransen zu verhindern.
- Beginnen Sie mit dem Sticken in der Mitte Entwurf.
- Verwenden Sie einen stoffspezifischen Marker, um ein Raster zu erstellen 10/10 Zellen, die Ihnen beim Nähen helfen.
