
3D Puffstickerei
 3D-Puff-Stickerei ist eine Art Stickerei, in der Objekte/Zahlen von der Basis angehoben werden, um a zu geben 3 Dimensionsaussehen.
Es liegt aus dem Namen, das 3D-Puff-Stickerei ermöglicht es, dass das Design ausgestoßen oder fett gedruckt wird, was aus weitem gesehen werden kann. In 3D-Puff-Stickerei, Schaum wird zwischen dem Hut und der Stickerei verwendet. Das nach dem Nähen ermöglicht es, dass der Puff befestigt wird. Dieser Schaum ist in einer Vielzahl von Dicken von 2 mm-3mm erhältlich. Sobald Sie das Nähen abgeschlossen haben, Der 3D -Puff wird aus dem Design entfernt, Ihr Design bleibt jedoch intakt auf benutzerdefinierten Kappen, Hüte, Kleidungsstücke und andere Bekleidungsgegenstände. Sie können diesen Schaum ausblenden, indem Sie denselben Farbfaden verwenden oder mehrere Fadenstiche auftragen.
Notiz: Es wird empfohlen, einen steifen Schaum zu vermeiden, da Sie ihn am Ende des Vorgangs entfernen müssen. Wenn dieser Schaum schwer ist, Es wird schwierig zu entfernen sein und es verschlechtert sich Ihre Stickerei.
Der erhöhte Teil von 3D-Puff-Stickerei Kann jeder Brief sein, Logo, oder ein anderes Design auf Ihren Hüten oder Kleidung. Also die Leute, die ihre Marke bewerben wollen, und fordern hochwertige Hüte für Sport, Paarhüte, und einheitliche Kappen können haben 3D-Puff-Stickerei auf ihren Hüten oder Kleidung durch Stickerei Logos, Designs oder andere Symbole usw..
Auswahl und Lage des 3D -Puff -Stickereidesigns auf Hüten
3D-Puff-Stickerei ist nicht nur auf die Vorderseite des Hutes beschränkt. Sie können es auf den linken Vorderpaneele nähen, an den Seiten und auch auf der Rückseite der Kappe. Aber es kann schwierig sein, wie in 6-Panel-Hüten die Nahen in der Mitte des gestickten Bereichs ragen. Es ist wichtig, die Auswahl des richtigen Stils für 3D -Puff zu gewährleisten Stickerei-Design. Aufgrund des dicken oder erhöhten Aussehens, 3D-Puff-Stickerei nimmt mehr Platz auf dem Hut ein und es gibt nur begrenzte Platz an den Seiten der Kappe. Die beste Position, um sich zu bewerben 3D-Puff-Stickerei ist auf der Vorder- oder Rückseite der Kappe. Verwendung von runden oder blockförmigen Buchstaben(0.25-0.33Zoll breit)zum 3D-Puff-Stickerei ist empfohlen. Zum Erstellen von Kunstwerken, Versuchen Sie, runde Ecken zu verwenden, in denen Ihre Nadel das perforiert Entwurf und schäumen Sie sich vollständig zum Nähen.
Stufen des gestickten Hutes mit 3D -Puff -Stickerei
Let’;S gehen durch die Stufen eines gestickten Hutes mit 3D-Puff-Stickerei.
Schritt 1- Die erforderlichen Materialien zusammenstellen
Heben Sie den Hut auf-Der erste Schritt in 3D-Puff-Stickerei beginnt mit der Auswahl der Hüte bis zu Ihrer Wahl. Unmengen von Hutdesigns sind im Internet frei verfügbar. Sie können auswählen, was Sie entweder Baseballkappen tragen möchten, Papa Hüte, Flat Bill Hüte, Sporthüte usw.. Der strukturierte Hut ist meine Wahl für 3D-Puff-Stickerei Um qualitativ hochwertige Ergebnisse zu erzielen.
Sticknadel(Verwenden Sie die Nadel, mit der mehrere Threads weitergegeben werden können.)
Stickgarn
Stellen Sie sicher, dass Sie eine breite Palette von Fadenfarben verwenden. Es ist ein wichtiger Teil jeglicher Art von Stickerei.
Schaum–; Wird verwendet, um einen 3D -Blick auf Ihren Entwurf. Verwenden Sie einen weißen oder schwarzen Schaum mit 2-3 mm Dicke.

Stickmaschine
Es ist die gleiche Art von Maschine, die für andere Arten von Stickereien verwendet wird. Diese Maschine gibt es in vielen Größenvarianten.
Computer und Software
Diese sind an gewohnt Digitalisieren Sie das Design Für die 3D -Puff -Stickerei vor der Dateiübertragung in die Maschine.
Stickrahmen
Legen Sie Ihren Hut über den Reifen, um ihn an Ort und Stelle zu halten, bevor Sie ihn in die Maschine einsperren. Diese Reifen wurden während der Stickerei von der Maschine bewegt, um das Design zu erstellen.
Klebespray
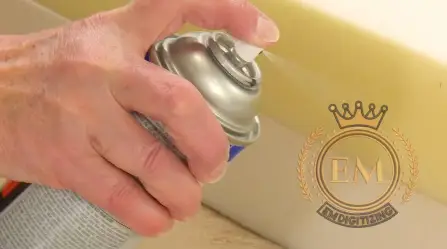 Es wird verwendet, um den Schaum an den Zielort während zu kleben 3D-Puff-Stickerei.
Heißluftpistole oder scharfe Pinzette
Verwendet, um den überschüssigen Schaum vom 3D -Puff abzureißen Stickerei-Design oder um den Schaum zu erhitzen, damit er am Ende eines stickenden Hutes leicht entfernt wird 3D-Puff-Stickerei.
Schritt 02: Digitalisieren Sie ein Design für 3D -Puff -Stickereien und übertragen Sie es auf die Maschine
Nachdem er den Hut abgeholt hat, Der nächste Schritt besteht darin, das Design zu erstellen. Let’;s Nehmen Sie das Beispiel des Blockbuchstabens t. Es gibt einige Grundregeln, denen Sie befolgen müssen Buchstaben digitalisieren Im Falle einer 3D -Puff -Stickerei.
- Zuerst, Konvertieren Sie Buchstaben von Text in Segmente in Vektorform, indem Sie ein Break-After-Tool aus dem verwenden Software. Machen Sie drei Teile des Buchstabens T und geben Sie ihnen nach Ihrer Bequemlichkeit unterschiedliche Farben.
- Überprüfen Sie die Ansicht.
- Zeichnen Sie den Umriss des Buchstabens mit einem Laufstich und ändern Sie diesen Stich auf 1,5 Milimeter und konvertieren Sie ihn in einen Bohnenstich, der mehrfach wie in Bedarf in der in Bedarf ausgeführt wird 3D-Puff-Stickerei. Es läuft 1 Vorwärts nähen und 2 Stiche rückwärts, oft als dreifacher Lauf bezeichnet.
- Stellen Sie dann sicher, dass der Startpunkt jedes Segments am Anfang des Endpunkts des vorherigen Segments liegt. Richten Sie die Punkte für jedes Stück aus und stellen Sie sicher, dass sie nicht mit dem nächsten Segment überlappt werden.
- Erweitern Sie nun Ihren Stich am Zugbereich Ihres Briefes, um sicherzustellen, dass er den Schaum abdeckt 3D-Puff-Stickerei.
- Fügen Sie dann einen Zick-Zack-Unterlagen-Einschaltabstand von 2 mm hinzu, damit er den Schaum nicht hinunter mischt und die Dichte erhöht 75%.
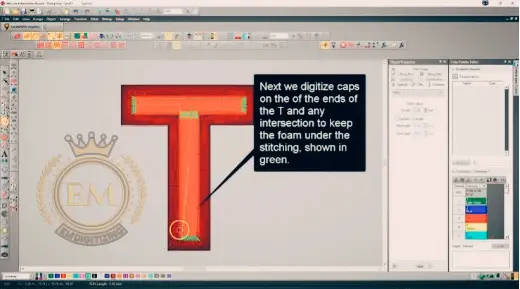
- Beginnen Sie zuerst mit Ihrem unteren Segment, um eine Kappe mit einem Satinstich am offenen Ende der Buchstaben zu erstellen, die von der gleichen Farbe wie die Farbe des Buchstabens sein sollten, um die Kanten des Schaums zu verbergen und in den Buchstaben zu halten.
- Stellen Sie sicher, dass Ihre Anker und Knoten am rechten Rand des Umrisss liegen. Erstellen. Erstellen Sie dann einen Laufstich, der parallel zum ursprünglichen Stich läuft. Machen Sie den gleichen Prozess mit dem oberen Stück der Kappe wie mit dem unteren Teil des Segments.
- Gehen Sie zum oberen Ende und fügen Sie Kappen an den offenen Enden mit einem Laufstich hinzu, um zwei Kappen anzuschließen.
- Jetzt dein Entwurf ist bereit und Sie können es ausdrucken, um die genaue Größe der Stickerei zu sehen. Oder Sie können es jetzt als DST -Datei speichern und abhängig von dem Typ, den Maschine das lesen kann Entwurf Datei und Eingeben von Elementen als Ausrichtung und Thread -Farbsequenz eingeben und die Maschine auf den manuellen/automatischen Modus einstellen.
Schritt 03- Fügen Sie einen Reifen hinzu
Now I’;Ich werde anbringen Cap Hooping zur Maschine. Oben auf dem Reifen, there is a small plate with a line where I’;Ich werde mich vor der Kappe anstellen. Ziehen Sie die Schweißbänder unter der Kappe heraus und befestigen Sie den Ort mit einem Band und rieben Sie die Kappe an die Maschine.
Schritt 04- Fügen Sie 3D -Umgebungsschaum hinzu
Sobald Sie die Stickerei gemacht haben, Schneiden Sie jetzt das Stück Schaum. Schneiden Sie den Schaum von einem halben Zoll größer als die fertige Stickerei. Manchmal müssen Sie Anpassungen an die Größe vornehmen.
Dicker Schaum ermöglicht dem 3D -Puff Stickerei-Design Um vom Hut aufzustehen. Es ist wichtig, die Farbe während der 3D -Puff -Stickerei zu ändern. Sobald Sie die Arbeit mit einer Farbe abgeschlossen haben, Stoppen Sie Ihre Stickmaschine. Schneiden Sie dann das Stück Schaum aus, das groß genug ist, um den Rest des Designs abzudecken und den Vorgang für verschiedene Farben zu wiederholen. Die Schaumfarbe sollte nahe an der Farbe des Fadens liegen, das zum Nähen des 3D -Puffs verwendet wird Stickerei-Design. Foam comes only in a basic colour that couldn’;Ich bin mit jeder Fadenfarbe abgestimmt. Daher verwenden die Menschen im Allgemeinen einen weißen Farbschaum für helle Farben und schwarzen Schaum für alle dunklen Farben.
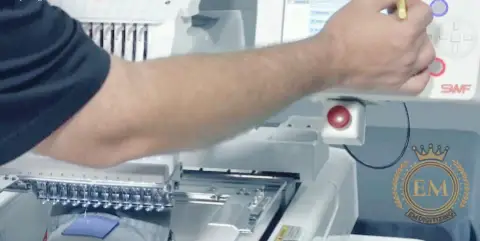
Schritt 05- Starten Sie die Maschine
Nächste, Wir drücken den Start und Maschinenstickerei und gehen Sie zum Nähen des 3D -Puff -Stickschaums zur Arbeit. Umlegen Sie den Schaumstoffbereich und nähen Sie dann einen Satinstich. Der geschwollene Teil sollte am Ende genäht werden. Zuerst, Nähen Sie alle flachen Abschnitte um den Schaum. Während die Nadel eindringt, Es schafft den ganzen und überschüssigen Schaum werden weggezogen. Halten Sie nun die Maschine an, um den überschüssigen Schaum abzureißen und den Rest der Stickerei zu vervollständigen, um den Schaum zu bedecken. Stellen Sie sicher, dass der Teil des Entwurf Muss sperrig sein, damit Schaum darüber arbeiten kann, um ihm einen 3D -Look zu verleihen.
Wichtiger Hinweis:
- Vermeiden Stick über den Puff, weil er den Puff flacht wird.
- Die Grafikleitungen zwischen Buchstaben sollten zwischen 3 mm und 10 mm dick sein.
- Wenn Sie mehr als einen Buchstaben auf Ihrem 3D -Puff verwenden Stickkappe, Der Abstand zwischen ihnen sollte berücksichtigt werden, da der Schaum dazu führt.
- Verschlüsselungsobjekte sollten verwendet werden, um den Schaum zu platzieren und zu vermeiden, dass Schaum an den Rändern ausgewölbt wird. Es besteht keine Unterlage und der Raum zwischen Stichen sollte 0,16 mm betragen.
Finalisierte Ihre Arbeit
Wenn die Stickmaschine vervollständigt seinen Job, Überschacher Schaum kann verwendet werden. Verwenden Sie scharfe Pinzetten, um den Schaum abzureißen. Und die Verwendung einer Heißluftpistole verkleinert die kleinen Schaumfragmente und sie verschwinden aus der Stick.
Fazit
Here’;S das Ende des Postens. I’;Ich bin mir ziemlich sicher, dass Ihnen der Prozess von gefallen wird Eine Kappe sticken Mit einem 3D -Puff -Stickerei -Look. Viele Menschen machen keine 3D -Puff -Stickerei. Es mag in der Anfangsreinheit schwierig sein, aber das Üben macht den Mann perfekt. Die Leute wollen das nicht nur haben Stickerei auf Kappen, aber sie benutzen auch Hosen, T-Shirts und Taschen usw.. Es wird empfohlen, diese Schritte zu befolgen, um magische Ergebnisse zu erzielen und auch Ihren Kunden zu gefallen. Wenn Sie diese 3D -Puff -Stickerei in Ihr Unternehmen hinzufügen, Weitere Kunden eilen sich zusammen mit ihrer Familie und ihren Freunden auf Sie zu. Somit, dein Stickereigeschäft wird abrupt schießen.


