Das Erstellen eines Umriss-Stickdesigns ist ein lohnender Prozess, der etwas Einzigartiges mit sich bringt, Verleihen Sie Ihren Stickprojekten einen eleganten Look. Konturdesigns betonen die Kanten, Details klar und deutlich machen. Wenn Sie neu in der Digitalisierung sind, Mach dir keine Sorgen!
Dieser Leitfaden führt Sie durch jeden Schritt, Von der Auswahl der richtigen Werkzeuge bis zur Feinabstimmung Ihres endgültigen Designs. Mit etwas Übung, Sie können jedes Bild in ein klares und professionelles Konturdesign umwandeln.
Bereit zum Start? Lass uns eintauchen!

Digitalisieren Sie perfekte Kontur-Stickdesigns: Ein Leitfaden für Anfänger
Beste Software zum Digitalisieren von Umriss-Stickmustern
Wenn Sie saubere und klare Umrissdesigns erstellen möchten, Hier sind die drei besten Softwareoptionen:
- Wilcom Stickerei Studio
- Bruder PE-Design
- Embird Studio
Diese Softwareprogramme bieten Tools, die die Digitalisierung von Umrissen einfach und in hoher Qualität ermöglichen.
1. Wilcom Stickerei Studio
Wilcom Embroidery Studio ist eine professionelle Software, die für ihre fortschrittlichen Tools bekannt ist, Damit ist es eines der besten für Stickkonturstichdesigns. Es bietet eine präzise Kontrolle über die Stichlänge, Dichte, und Platzierung, hilft Ihnen dabei, reibungslos zu arbeiten, klare Linien. Mit integrierten Werkzeugen, die speziell für Umrisse entwickelt wurden, Wilcom stellt sicher, dass jeder Konturstich scharf und gleichmäßig ist, was es beliebt macht professionelle Digitalisierer.
2. Bruder PE-Design
Brother PE-Design ist einfach zu bedienen und bietet robuste Funktionen für Anfänger und Profis gleichermaßen. Es ermöglicht eine schnelle Einrichtung und reibungslose Bearbeitung von Umriss-Stickdesigns, Dadurch ist es einfach, hochwertige Designs zu erstellen. Die intuitive Benutzeroberfläche der Software und die verschiedenen Stichoptionen eignen sich ideal zum Erstellen detaillierter Konturen, Dies macht es zu einer ausgezeichneten Wahl für jeden, der danach sucht Erstellen Sie hochwertige Designs mit minimalem Aufwand.
3. Embird Studio
Embird Studio ist eine vielseitige Software, die Flexibilität beim Entwerfen von Umrissstichen bietet. Der vektorbasierte Ansatz hilft Ihnen, genaue und skalierbare Designs zu erstellen, Dies ist besonders nützlich für Konturstichstickereien. Das Programm umfasst außerdem eine breite Palette an umrissspezifischen Tools, So können Sie jedes Detail anpassen und verfeinern, um jedes Mal ein professionelles Finish zu gewährleisten.
So digitalisieren Sie Umriss-Stickmuster | Schritt für Schritt
Hier finden Sie eine Schritt-für-Schritt-Anleitung zum Erstellen eines Umriss-Maschinenstickmusters Wilcom-Stickerei Studio.
1. Öffnen Sie Ihr Bild in Wilcom
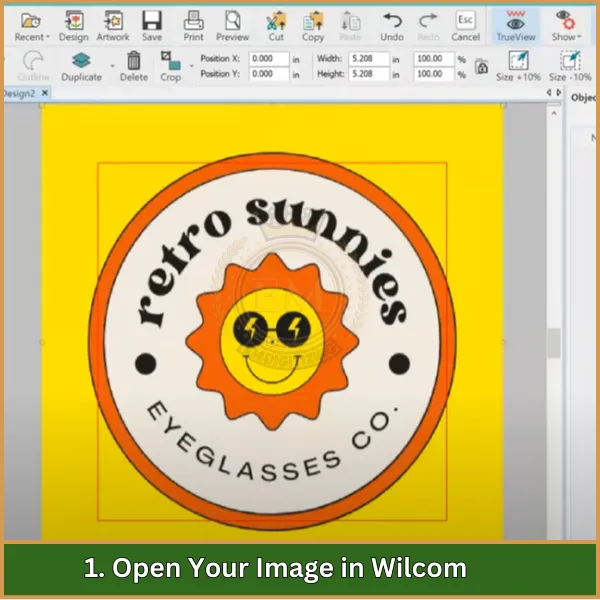
Öffnen Sie zunächst das Bild, das Sie digitalisieren möchten. Gehe zu Datei >; Import und wählen Sie Ihr Bild aus. Dies dient als Grundlage für Ihren Gliederungsentwurf.
2. Richten Sie Ihren Arbeitsbereich ein
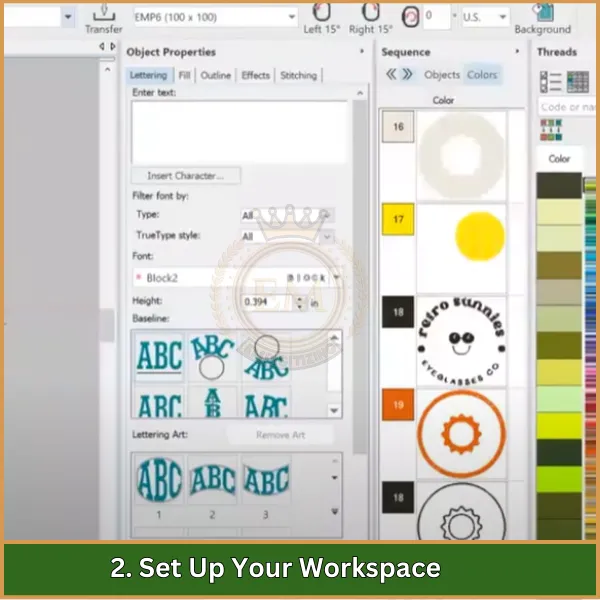
Passen Sie die Arbeitsbereichseinstellungen an Ihre Designanforderungen an. Stellen Sie die Rahmengröße ein, Gewebe-Art, und andere Optionen, um sicherzustellen, dass Ihre Kontur gut in den Stickbereich passt.
3. Wählen Sie das Konturwerkzeug aus
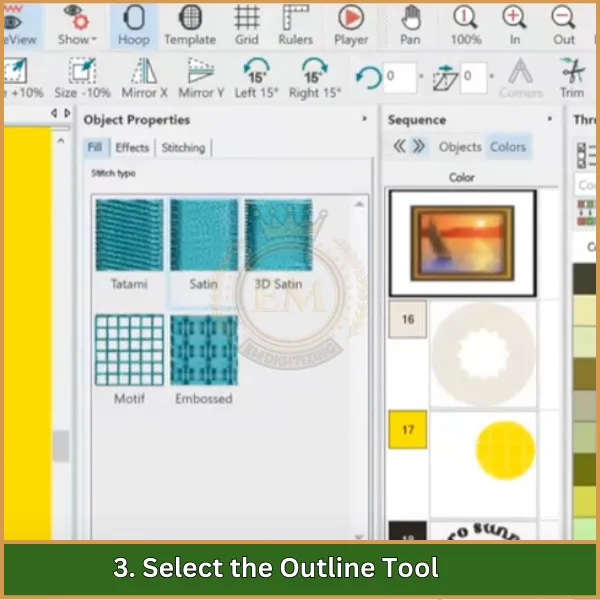
Wählen Sie das Gliederungstool aus der Symbolleiste. Dieses Werkzeug ist speziell zum Erstellen sauberer und kontinuierlicher Konturstiche gedacht, Ideal für die Umrissdigitalisierung von Designs.
4. Verfolgen Sie den Umriss
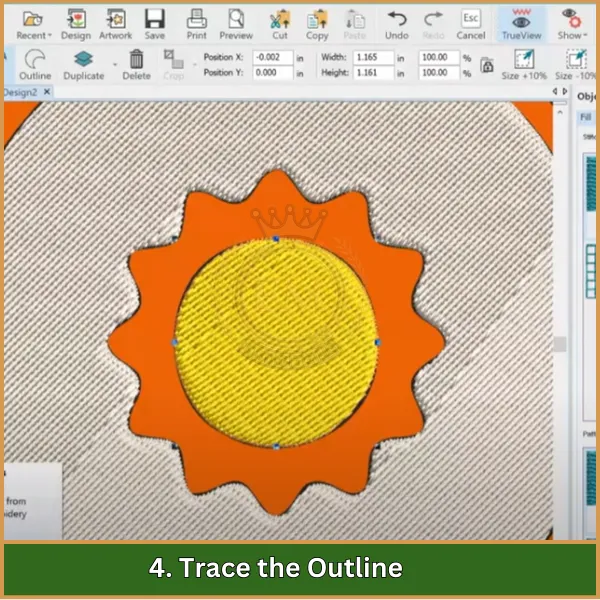
Verwenden des Gliederungstools, Zeichnen Sie entlang der Ränder Ihres Bildes nach. Achten Sie darauf, den Konturen reibungslos zu folgen, da dies Auswirkungen auf die endgültige Stichqualität hat.
5. Passen Sie die Sticheinstellungen an
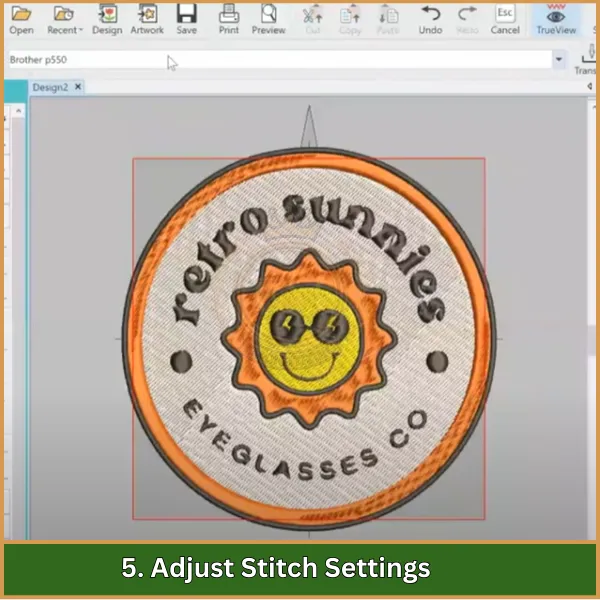
Stellen Sie den Stichtyp ein, Länge, und Dichte für den Umriss. Für Konturenstickerei, A Vorstich oder Plattstich funktioniert normalerweise am besten. Passen Sie diese Einstellungen an, um die gewünschte Dicke und den gewünschten Stil zu erhalten.
6. Optimieren Sie die Gliederung
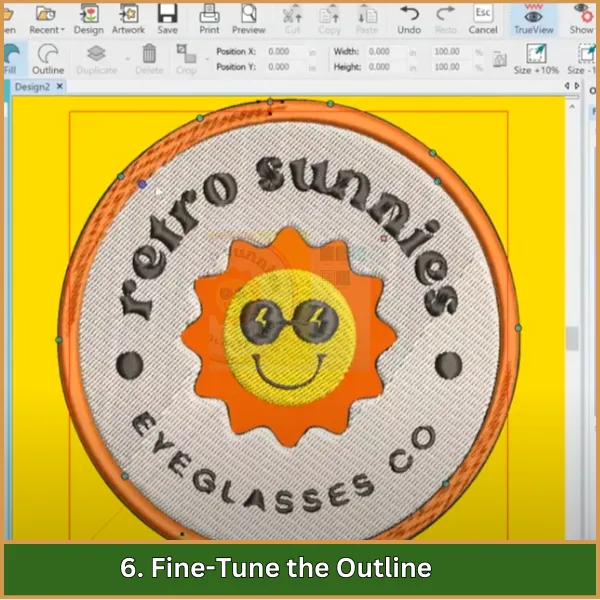
Zoomen Sie hinein, um nach Lücken oder unebenen Linien zu suchen. Nehmen Sie nach Bedarf Anpassungen vor, indem Sie Punkte entlang der Kontur auswählen und die Form verfeinern.
7. Zeigen Sie eine Vorschau des Designs an und speichern Sie es
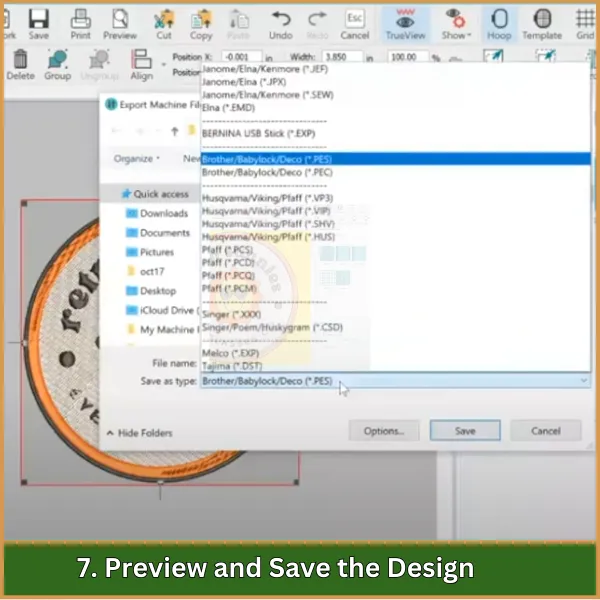
Benutzen Sie die Vorschau Mit dieser Funktion können Sie überprüfen, wie das Motiv nach dem Sticken aussehen wird. Einmal zufrieden, Speichern Sie Ihre Arbeit im gewünschten Dateiformat, wie Sommerzeit, für Stickmaschinen.
Grundlegende Techniken zur Perfektionierung der Umrissdigitalisierung
Hier sind einige wichtige Techniken, um sicherzustellen, dass Ihre Stickkonturstichdesigns sauber und professionell werden.
- Behalten Sie eine einheitliche Richtung bei: Von einem Ende zum anderen digitalisieren (etwa von links nach rechts oder von unten nach oben) um unnötige Schnitte zu reduzieren und den Umriss zusammenhängend zu halten.
- Strategische Reihenfolge: Legen Sie die Stickreihenfolge im Voraus fest, um Beschnitte und Reisestiche zu minimieren, Gewährleistung eines reibungslosen Arbeitsablaufs.
- Perfekt mit dem Reshape Tool: Tippen Sie auf die Taste „H“, um auf das Reshape-Tool zuzugreifen, So können Sie den Umriss verfeinern und eine präzise Platzierung erreichen.
- Wählen Sie die richtigen Tools: Für Umriss-Stickdesign, Verwenden Sie das Single Run Outline Tool, und für satinierte Gegenstände, Verwenden Sie das Spalte-A-Werkzeug, um ein klares Ergebnis zu erzielen, definierte Kanten.
- Organisieren Sie mit der Farbobjektliste: Halten Sie Ihre Designsequenz organisiert und leicht anpassbar, indem Sie jeden Teil über die Farbobjektliste verfolgen.
- Passen Sie die Sticheinstellungen sorgfältig an: Passen Sie Stichlänge und -dichte an die Stoffart an, Optimieren Sie sowohl das Aussehen als auch die Haltbarkeit.
- Effizient reisen: Verwenden Sie Einzellaufstiche, um sich unter andere Objekte zu bewegen, Vermeiden Sie zusätzliche Verzierungen und schaffen Sie ein nahtloses Design.
- Glatte Konturen sind wichtig: Konzentrieren Sie sich darauf, eine glatte Oberfläche zu schaffen, ununterbrochene Linien und Kurven für einen raffinierten und professionellen Look.
Fazit
Zum Abschluss, Die Digitalisierung Ihres Umriss-Stickmusters ist eine großartige Möglichkeit, ein gestochen scharfes Ergebnis zu erzielen, professionelle Ergebnisse. Mit Übung, Sie können den Prozess beherrschen, aber wenn Sie sich lieber auf Ihr Handwerk konzentrieren möchten, EMDigitizing ist für Sie da!
Wir bieten erschwinglich, hochwertig Digitalisierung von Dienstleistungen mit garantiert kurzen Durchlaufzeiten, damit Ihre Projekte auf Kurs bleiben. Plus, Wir bieten eine Vorschauoption, damit Sie Ihr Design sehen können, bevor es fertiggestellt ist.
Und hier ist ein Bonus: wenn dies Ihre erste Bestellung bei uns ist, Sie erhalten eine 50% Rabatt. Lassen EMdigitalisieren Behandeln Sie die Details, damit Sie jedes Mal eine makellose Stickerei genießen können!
Häufig gestellte Fragen
Verwenden Sie Software wie Wilcom, Luke, or Brother’;s PE-Design, die für ihre robusten Funktionen und benutzerfreundlichen Schnittstellen beliebt sind, Ideal zum Digitalisieren von Umrissstichen.
Beginnen Sie mit dem Importieren Ihres Designs in die Software, Zeichnen Sie dann die Umrisse mit dem Stiftwerkzeug nach, Stellen Sie den Stichtyp auf „Lauf“ oder „Rückstich“ für saubere Stiche ein, präzise Linien.
Einfach, klare Umrisse, wie man sie in Logos findet, Text, und einfache Formen eignen sich am besten zum Digitalisieren, sorgt für saubere und scharfe Nähergebnisse.
Eine ideale Stichlänge für Konturstiche liegt typischerweise zwischen 2 zu 3 Millimeter, sorgt für ein Gleichgewicht zwischen Glätte und Details.
